Email management

How to Send Transactional Emails With JAVA? (3 Methods With Codes - JavaMail API, Simple Java Mail & SuprSend)

Sanjeev Kumar
January 13, 2024
TABLE OF CONTENTS

Sending emails is indispensable for large-scale customer-centric applications, providing a straightforward, cost-effective, and user-friendly means of communication. This method is crucial for notifying users about various application events, such as account activation, password changes, and user verification. Over the years, Java has consistently ranked among the top programming languages, making it a preferred choice for enterprises dealing with common challenges in designing robust applications.

This article delves into three distinct methods of sending transactional emails using Java, offering insights into the advantages and disadvantages of each approach.

Method 1: Using JavaMail API

JavaMail API, a platform-independent and protocol-independent framework, empowers Java client applications for comprehensive email and messaging functionalities. Its generic interface provides abstract classes containing objects created in the email system.

Pros:

  1. Well-structured and Widely Used: JavaMail API is known for its robust structure and widespread adoption, particularly in enterprise applications.
  2. Versatility in Functionality: Offers a comprehensive set of functionalities, including reading, composing, and sending emails.
  3. Programmatic Accessibility: Facilitates integration with other programs, simplifying the process of sending mail confirmations or other messages.

Cons:

  1. Extended Compilation Time: Developers might experience longer code compilation times due to the nature of JavaMail API.
  2. Memory Consumption: Utilizing the Mail API may lead to a significant consumption of JAVA heap space.

Demonstration:

Step 1: Installing JavaMail API

  • Inclusion of JAR files (mail.jar and activation.jar) in the CLASSPATH.
  • Setting up an SMTP server (e.g., Pepipost) for email transmission.

Step 2: Getting the Mail Session

  • Obtain a session object with host information using javax.mail.Session class.
Code Container Example
      
         Properties properties = new Properties();
         Session session = Session.getDefaultInstance(properties, null);


  • Authentication for a network connection:
       
          Session session = Session.getInstance(properties, new javax.mail.Authenticator() {
              protected PasswordAuthentication getPasswordAuthentication() {
                  return new PasswordAuthentication("sender@gmail.com", "password");
              }
          });


Step 3: Composing the Email

  • Utilize javax.mail.internet.MimeMessage subclass to configure sender, receiver, subject, and message body.
        
            MimeMessage message = new MimeMessage(session);
            // Sender email
            message.setFrom(new InternetAddress(from));
            // Receiver email
            message.addRecipient(Message.RecipientType.TO, new InternetAddress(to));
            // Email subject
            message.setSubject("This is the email subject");
            // Email body
            message.setText("This is the email body");


Step 4: Adding Attachments

  • For including attachments, create a Multipart object and add a BodyPart for each attachment.
        
            Multipart multipart = new MimeMultipart();

            // Create a BodyPart for the main email content
            BodyPart messageBodyPart = new MimeBodyPart();
            messageBodyPart.setText("This is the email body");

            // Add the main content BodyPart to the Multipart
            multipart.addBodyPart(messageBodyPart);

            // Create a BodyPart for the attachment
            messageBodyPart = new MimeBodyPart();
            DataSource source = new FileDataSource("path/to/attachment.txt"); 
            messageBodyPart.setDataHandler(new DataHandler(source));
            messageBodyPart.setFileName("attachment.txt");

            // Add the attachment BodyPart to the Multipart
            multipart.addBodyPart(messageBodyPart);

            // Set the Multipart as the message content
            message.setContent(multipart);


Step 5: Sending the Email

  • Employ the javax.mail.Transport class to send the email.
        
            Transport.send(message);


Complete Code Example:

        
          // Import statements and package declaration

          public class SendMail {
              public static void main(String[] args) {
                // Email details
                String to = "receiver@gmail.com";
                String from = "sender@gmail.com";
                String host = "smtp.gmail.com";

                // System properties and configuration
                Properties properties = System.getProperties();
                properties.put("mail.smtp.host", host);
                properties.put("mail.smtp.port", "465");
                properties.put("mail.smtp.ssl.enable", "true");
                properties.put("mail.smtp.auth", "true");

                // Session setup with authentication
                Session session = Session.getInstance(properties, new javax.mail.Authenticator(){
                  protected PasswordAuthentication getPasswordAuthentication() {
                    return new PasswordAuthentication("sender@gmail.com", "password");
                  }
                });

                try {
                  // Creating and configuring the MimeMessage
                  MimeMessage message = new MimeMessage(session);
                  message.setFrom(new InternetAddress(from));
                  message.addRecipient(Message.RecipientType.TO, new InternetAddress(to));
                  message.setSubject("This is the email subject");

                  // Adding Attachments
                  Multipart multipart = new MimeMultipart();
                  BodyPart messageBodyPart = new MimeBodyPart();
                  messageBodyPart.setText("This is the email body");
                  multipart.addBodyPart(messageBodyPart);

                  messageBodyPart = new MimeBodyPart();
                  DataSource source = new FileDataSource("path/to/attachment.txt"); 
                  messageBodyPart.setDataHandler(new DataHandler(source));
                  messageBodyPart.setFileName("attachment.txt");
                  multipart.addBodyPart(messageBodyPart);

                  message.setContent(multipart);

                  // Sending the email
                  Transport.send(message);
                } catch (MessagingException mex) {
                  mex.printStackTrace();
                }
             }
          }


Method 2: Using Simple Java Mail

Simple Java Mail, a user-friendly mailing library, presents a straightforward API for sending SMTP emails in Java. It serves as a wrapper around the JavaMail API, simplifying the email sending process by eliminating several classes and properties.

Pros:

  1. Robust, Small, and Lightweight: Simple Java Mail boasts robustness while maintaining a small and lightweight footprint (134kB).
  2. Strict RFC Compliance: Complies with all RFCs, ensuring compatibility with various email clients.
  3. Authenticated SOCKS Proxy Support: Unique capability to send emails through an authenticated SOCKS proxy.
  4. Advanced Features: Provides support for HTML, images, and attachments.
  5. Allows sending emails to multiple receivers simultaneously.

Cons:

  1. Community Support Considerations: The community support for Simple Java Mail may be relatively smaller compared to JavaMail API.

Demonstration:

Sending Enhanced Emails with Simple Java Mail

Sending emails using Simple Java Mail is a straightforward process. Extend its capabilities by incorporating HTML content and attachments:

  1. Create an Email Object with HTML and Attachments:
        
            Email email = EmailBuilder.startingBlank()
                .from("From", "from@example.com")
                .to("1st Receiver", "rec1@example.com")
                .to("2nd Receiver", "rec2@example.com")
                .withSubject("Enhanced Email with HTML and Attachments")
                .withHTMLText("

Hello!

This is an enhanced email with HTML content.

") .withAttachment("path/to/attachment.txt") .buildEmail();


  • Create a Mailer Object using MailerBuilder:
        
            Mailer mailer = MailerBuilder
                .withSMTPServer("smtp.mailtrap.io", 2525, "username", "password")
                .withTransportStrategy(TransportStrategy.SMTPS)
                .buildMailer();


  • Send the Enhanced Email:
        
            mailer.sendMail(email);


Additional Configuration Options:

Simple Java Mail provides various options to configure both email and the mailer. Developers can tailor the email sending process according to their specific requirements. Detailed information on available configurations can be found in the Simple Java Mail documentation.

Complete Code Example:

        
            // Import statements and package declaration

            public class SendEnhancedMail {
                public static void main(String[] args) {
                    // Create an Email object with HTML and Attachments using EmailBuilder
                    Email email = EmailBuilder.startingBlank()
                        .from("From", "from@example.com")
                        .to("1st Receiver", "case1@example.com")
                        .to("2nd Receiver", "case2@example.com")
                        .withSubject("Enhanced Email with HTML and Attachments")
                        .withHTMLText("

Hello!

This is an enhanced email with HTML content.

") .withAttachment("path/to/attachment.txt") .buildEmail(); // Create a Mailer object using MailerBuilder Mailer mailer = MailerBuilder .withSMTPServer("smtp.mailtrap.io", 2525, "username", "password") .withTransportStrategy(TransportStrategy.SMTPS) .buildMailer(); // Send the Enhanced Email mailer.sendMail(email); } }


Method 3: Using SuprSend - Third-Party Multichannel Notification Infrastructure with JAVA SDKs

A third-party multichannel notification infrastructure provider, such as SuprSend, presents an avenue for sending cross-channel notifications through a unified API, covering various channels like Emails, SMS, and Push Notifications. SuprSend streamlines the notification flow by managing all relevant channels and providers seamlessly through a single API, eliminating the need for extensive coding.

Key Features & Benefits:

  1. Extensive Integration Options: Seamless integration with 50+ Communication Service Providers (CSPs) and across 6+ communication channels, like Mixpanel, Segment, Twilio, Mailchimp, Slack, Teams, SNS, Vonage, Whatsapp and more.
  2. No Tech Dependency: End-to-end notification management without involving the engineering team, optimizing their productivity. Just integrate the JAVA SDK once, and your product team will manage everything else.
  3. Intelligent Routing: Create and implement intelligent cross-channel flows across providers without technical dependencies.
  4. In-App SDK: Provides a fully loaded, developer-ready in-app layer for both web and mobile applications.
  5. Granular Template Management: Utilize an intuitive drag & drop editor for designing templates, offering superior control over the content.
  6. Powerful Workspace: Efficiently manage various projects with distinct integrations, workflows, and templates in each workspace.
  7. Unified Analytics: Track, measure, and make data-driven decisions with a unified view of cross-channel analytics across vendors.
  8. Smart Automation: Automate synchronization, refreshing, and notification triggers, allowing more focus on critical tasks.
  9. Quick Scalability: SuprSend automates scalability, putting it on autopilot for a hassle-free experience.

Cons:

  1. Cost Considerations: Managing multiple notification channels may incur costs. Monthly Notification Limits:
  2. Be mindful of limitations on the maximum number of notifications receivable per month.

Designed with a "developer-first" approach, SuprSend handles the heavy lifting, enabling engineering teams to concentrate on their tasks without the added complexity of managing notifications.

Getting Started with SuprSend for Sending emails in JAVA:

Step I: Log in to the SuprSend Account.

Image description

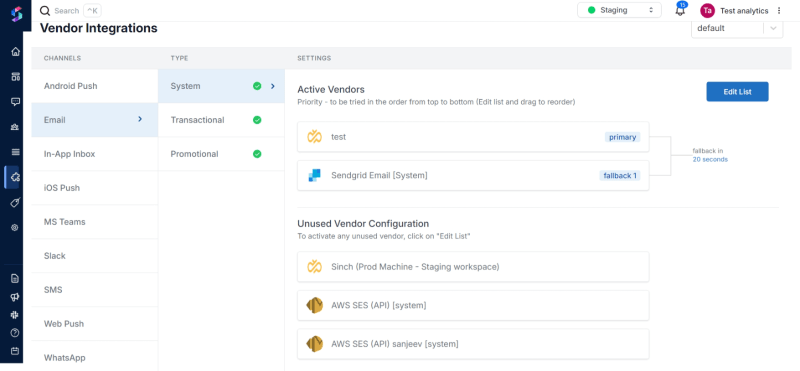
Step II: Integrate with Email(s).

  • SuprSend provides a ready-to-integrate provider list for emails, including AWS SES, Mailchimp (Mandrill), Mailgun, Netcore, Outlook, Postmark, SendGrid, and more.
  • After logging in, navigate to the integration section, choose the desired email channel, and enter the necessary information.
Image description

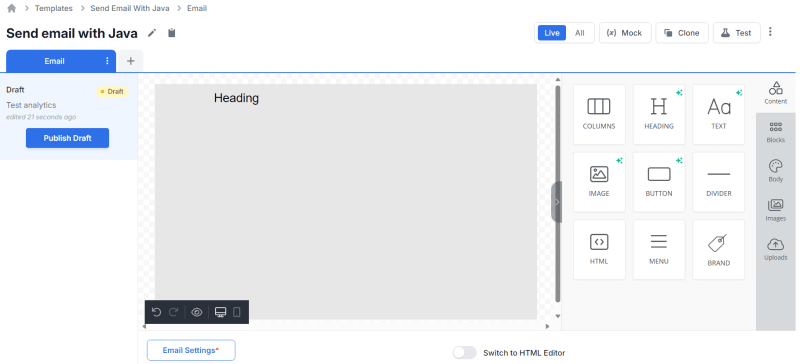
Step III: Create & Load Template.

  • SuprSend allows you to create and store messaging content with a user-friendly drag & drop editor. To create a template, head to the "Templates" tab, click "Create," and then utilize the "Drag & Drop Editor" for customization.
Image description

Step IV: Create Smart Flow (Routing).

  • Define rules and logic effortlessly by heading to the "Workflows" tab. Choose "Single Channel" and create a flow by adding basic details and logic conditions.
  • Combine templates, providers, routes, and channels to fire notifications.
Image description

Step V: Trigger a Notification Event via API
Following this step, we'll integrate the SuprSend API into our Java application. Begin by updating the Maven pom.xml file with the provided dependency and execute mvn compile to download the necessary components. More info in documentation.

        
            <dependencies>
              <dependency>
                <groupId>com.suprsend</groupId>
                <artifactId>suprsend-java-sdk</artifactId>
                <version>0.5.0</version>
              </dependency>
            </dependencies>


Sample Code to call Suprsend backend using SDK and trigger workflows.

        
            package tests;

            import java.io.File;
            import java.io.FileInputStream;
            import java.io.FileNotFoundException;
            import java.io.InputStream;

            import org.json.JSONObject;
            import org.json.JSONTokener;

            import suprsend.Suprsend;

            public class TestSuprsendSDK {

                private JSONObject loadBody(String fileName) throws FileNotFoundException {
                    JSONObject jsonObject;
                    String relativePath = String.format("%s/src/%s/resources/%s.json", System.getProperty("user.dir"),
                            this.getClass().getPackage().getName(), fileName);
                    InputStream schemaStream = new FileInputStream(new File(relativePath));
                    jsonObject = new JSONObject(new JSONTokener(schemaStream));
                    return jsonObject;
                }

                public static void main(String[] args) throws Exception {
                    TestSuprsendSDK sdk = new TestSuprsendSDK();
                    // Load workflow body json
                    JSONObject body = sdk.loadBody("input");
                    // SDK instance
                    Suprsend suprsend = new Suprsend("WORKSPACE KEY", "WORKSPACE KEY");
                    Workflow wf = new Workflow(body, idempotencyKey, brandId)

                    // Trigger workflow
                    JSONObject resp = suprClient.triggerWorkflow(wf);
                    System.out.println(resp);
                }

            }}


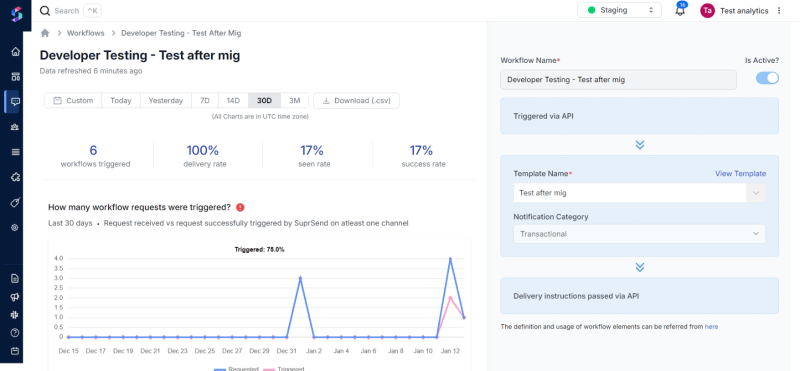
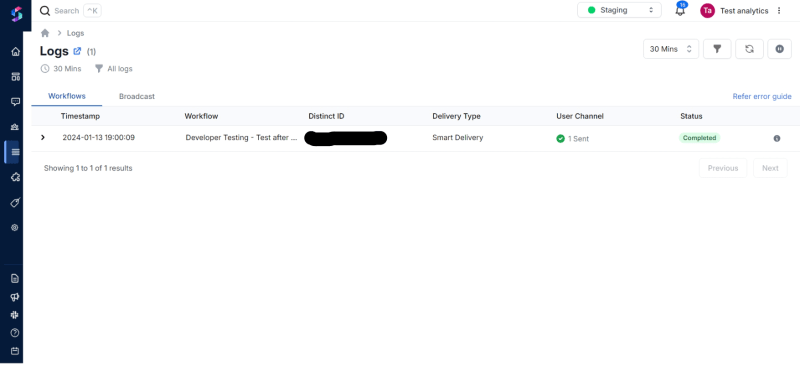
Step VI: Check Event Analytics And Logs.

  • Gain granular channel-wise and vendor-wise analytics through the unified dashboard. View "Event Analytics" for actionable insights and access detailed logs through the "Logs" tab. Explore more about logs.
Image description

Closing Remarks:

As businesses grow, managing notification API becomes complex. SuprSend, a notification infrastructure management software, offers a solution by simplifying overall communication stack management.

Written by:
Sanjeev Kumar
Engineering, SuprSend
ABOUT THE AUTHOR

What’s a Rich Text element?

The rich text element allows you to create and format headings, paragraphs, blockquotes, images, and video all in one place instead of having to add and format them individually. Just double-click and easily create content.

Static and dynamic content editing

A rich text element can be used with static or dynamic content. For static content, just drop it into any page and begin editing. For dynamic content, add a rich text field to any collection and then connect a rich text element to that field in the settings panel. Voila!

How to customize formatting for each rich text

Headings, paragraphs, blockquotes, figures, images, and figure captions can all be styled after a class is added to the rich text element using the "When inside of" nested selector system.

Implement a powerful stack for your notifications

By clicking “Accept All Cookies”, you agree to the storing of cookies on your device to enhance site navigation, analyze site usage, and assist in our marketing efforts. View our Privacy Policy for more information.