This guide explores the process of establishing a programmatic Node.js-based transactional email delivery system using Brevo's (formerly Sendinblue) transactional email API, shedding light on potential challenges and offering insights into optimizing this crucial aspect of communication.
Prerequisites
Before delving into the hands-on tutorial, ensure you meet the following prerequisites:
- General familiarity with JavaScript and Node.js.
- Understanding of the async/await syntax in JavaScript.
- Proficiency in using the node command in the command line.
- Awareness of Express.js functionality and how middlewares operate in Express.js.
Now, let's proceed with setting up Brevo (formerly Sendinblue) node.js for email sending. Let's dive in.
How to Send Emails with Nodejs and Brevo (formerly Sendinblue) API?
To send transactional emails using Brevo (formerly Sendinblue) Node.js, the initial step is to register for a free Brevo account. Follow their step-by-step email API integration guide outlined below.
Register and Generate an API Key on Brevo (formerly Sendinblue)
- Begin by registering for a free Brevo (formerly Sendinblue) account using a valid email address and a password.
- After registration and account setup, create a new audience (list) in Brevo (formerly Sendinblue).
- Generate the API key from your account settings. Copy and securely store the API key for future use.
Setting Up a Node.js Script to Send Emails with Brevo (formerly Sendinblue)
To initiate a new Node.js application using npm, execute the following commands:
The `-y` flag will set default values. Next, set the API key created in the `brevo.env` file, and ensure it's added to `.gitignore`:
Ensure to replace `YOUR_API_KEY` with the generated API key from the previous step. Afterward, install the `@getbrevo/brevo` npm package:
This command adds the latest version of the package to `package.json` and installs it locally in the `node_modules` folder.
Now, let's write code to test sending emails with Brevo (formerly Sendinblue):
This code includes the @getbrevo/brevo package, initializes Brevo, sets the API key, and demonstrates examples of fetching account information and sending a transactional email using Brevo's API. After running this script with node send-test-email.js, you should see output logs indicating the account information and successful email sending.
Creating an Order Confirmation Email API in Node.js Using Brevo (formerly Sendinblue)
For a practical example, let's transform the script into an API using Express.js. Install Express.js:

Create two files: `index.js` for the web server and `email.js` for the email service. Here's the `index.js`:
This Express server sets up a route for a simple "alive" message at the root and an API endpoint for sending order confirmation emails. The error handling middleware is also included.
Now, let's examine the structure of our email.js file. I utilized the Stripo.email free plan to create a mock order confirmation email, incorporating their provided template. Below is our email.js file, which assembles the email and dispatches it through Brevo (formerly Sendinblue):
Replace <dc> in the Brevo API URL with your Brevo (formerly Sendinblue) data center code, and ensure to replace BREVO_API_KEY with the actual API key you generated from your Brevo (formerly Sendinblue) account.
Let's delve into the functionality of email.js:
- Integration with Brevo (formerly Sendinblue): The module begins by importing the @getbrevo/brevo module and setting the API key using brevo.setApiKey().
- Order Confirmation HTML Template: The getOrderConfirmationEmailHtml function holds the extensive HTML template for the order confirmation email. It dynamically incorporates the customer's name and order number.
- Assembling the Email Message: The getMessage function constructs the email message with details such as recipient, sender, subject, text, and HTML body. The HTML body is generated using the previously defined template.
- Sending the Order Confirmation Email: The sendOrderConfirmation function orchestrates the entire process. It calls the sendTransacEmail method on the brevo module, passing the parameters obtained from getMessage. Any errors are caught, logged, and an appropriate response is sent back.
- Module Export: Finally, only the sendOrderConfirmation function is exposed from this module.
Once both files are correctly set up, you can launch the server with `node index.js`. Testing the order confirmation email API can be done with a cURL command:
A successful response should display a 200 status, and you should find the confirmation email in your inbox.
Congratulations! The fundamental order confirmation email functionality is operational. The HTML template, though lengthy, can be replaced using Brevo's (formerly Sendinblue) Dynamic templates.
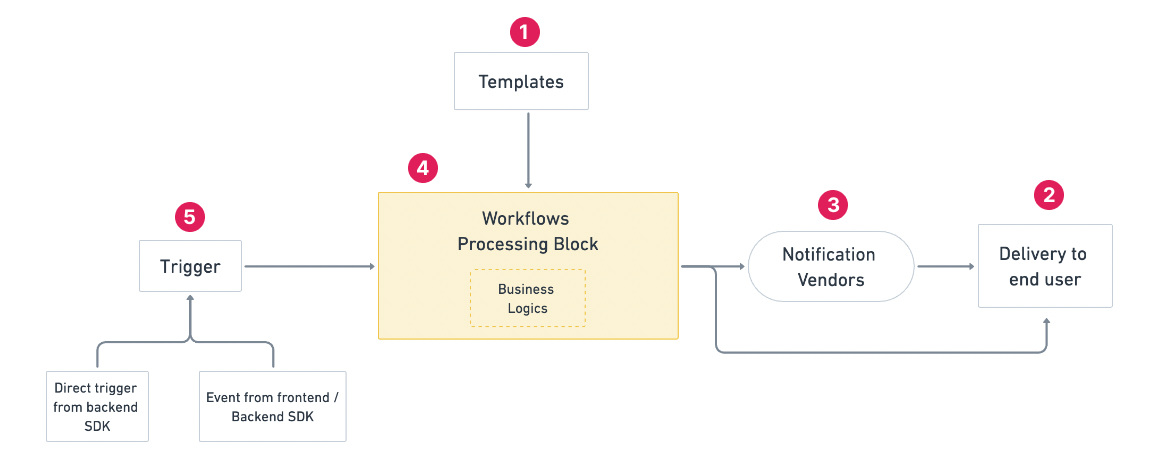
While the method described above is functional, it may have certain limitations, and that's where SuprSend can offer valuable enhancements:
- Scalability Challenges: For scaling the nodejs email sending task, two primary options are presented. One is utilizing a queue system like RabbitMQ, employing producers and consumers to handle messages efficiently. Alternatively, a serverless FaaS (function-as-a-service) approach, using platforms like AWS Lambda or Vercel, provides a low-maintenance scaling solution. The order placement logic can asynchronously call this API, ensuring scalability with minimal resource concerns. Further exploration into scalability, costs, and potential hosting options is encouraged. The current implementation may face challenges in handling a rapidly increasing number of orders. As the order volume grows, the synchronous nature of the nodejs email sending process might lead to potential bottlenecks, affecting overall system scalability.
- Limited Monitoring and Analytics: The existing solution may lack comprehensive monitoring and analytics capabilities, making it challenging to gather insights into email delivery performance, recipient engagement, and potential issues.
- Maintenance Overhead: Managing and maintaining the nodejs email sending infrastructure, including handling errors and ensuring deliverability, might require ongoing effort and expertise.
- Integration Complexity: Integrating and maintaining multiple components, such as the email template, Brevo (formerly Sendinblue), and error handling, could introduce complexities and potential points of failure.
- Cost Considerations: Depending on the email volume, the costs associated with using Brevo (formerly Sendinblue) and managing the infrastructure may become a concern.
For all these challenges, you can use SuprSend as a possible parent email infrastructure coupled with your product in Node.js to get started with any email provider such as Brevo (formerly Sendinblue). You can install and integrate SuprSend Node SDK to set up your product email notification infrastructure. Save yourselves from multiple vendor API integrations and email configurations for lifetime with these 4 easy steps