
What is push notification?
Push notifications are pop-up messages sent to a mobile app. It appears in the notification tray or on the lock screen [if the device is locked] of your mobile device. These notifications are designed to grab user’s attention and increase the app interaction rate. Generally used to send reminders, updates, and other alert messages
Why push notification is an important engagement tool for companies?
According to a survey conducted by reviews.org, the average U.S. user checks his phone “344 times a day, i.e., every 4 minutes” and 70% of the users have a tendency to check their phones within 5 mins of receiving a notification.
It is recommended to send no more than a few push notifications (1 per day or max 5 per week) to avoid causing users to unsubscribe or uninstall the app.
- Increases customer engagement and loyalty: Push notifications usually have high click-through rates (~10% if targeted correctly) which is 5x higher than email notifications.
- Delivers personalized and timely information: According to a survey by Epsilon, 80% of consumers reported that they were more likely to purchase as a result of receiving a timely, personalised notification.
- Can create artificial urgencies to increase sales: Another study by Leanplum found that push notifications with a sense of urgency, such as those that promoted limited-time offers or discounts, had a 4x higher CTR compared to notifications without them.
What is FCM?
Firebase Cloud Messaging (FCM) is a cross-platform messaging solution that lets you reliably send messages at no cost. Using FCM, you can notify a client app about product updates in real-time. For use cases such as instant messaging, a message can transfer a payload of up to 4 Kb to a client app at a time.
How does FCM push notification work?
Let’s first understand the actors involved in completing a push transaction -
- Push Service (FCM Server) — Cloud service from Google that allows app developers to send notifications to users across a variety of platforms, including Android, iOS and web applications.
- User Device — The devices/endpoint on which the user is using your mobile / web app and the push notification will be shown.
- Your Server — This is the server that will decide what content needs to be sent to the Push Service in turn to send a push notification to the end user’s device.
FCM Communication Flow Steps
The communication flow to send a push notification involves the following steps:
- Once the user installs the app on their device, the mobile app requests the FCM Server to generate a unique FCM device token for this endpoint (user’s mobile device).
- This FCM device token is sent to Your Server in case you have to send a 1–1 push message toward this specific endpoint (user’s mobile device).
Note: FCM also provides a solution to broadcast a particular message to a set of users and it is not mandatory for you to have users’ device tokens in such a case.
- Now based on your business logic you can trigger push notifications to the user’s device by calling a simple POST HTTP FCM API.
Step 1 [Optional] — Create a Firebase project in the Firebase Console
Firebase project is where your app will be registered. You can attach more than one app to the same project but not the same app to multiple projects. Your Firebase configuration keys will also be unique to the project.
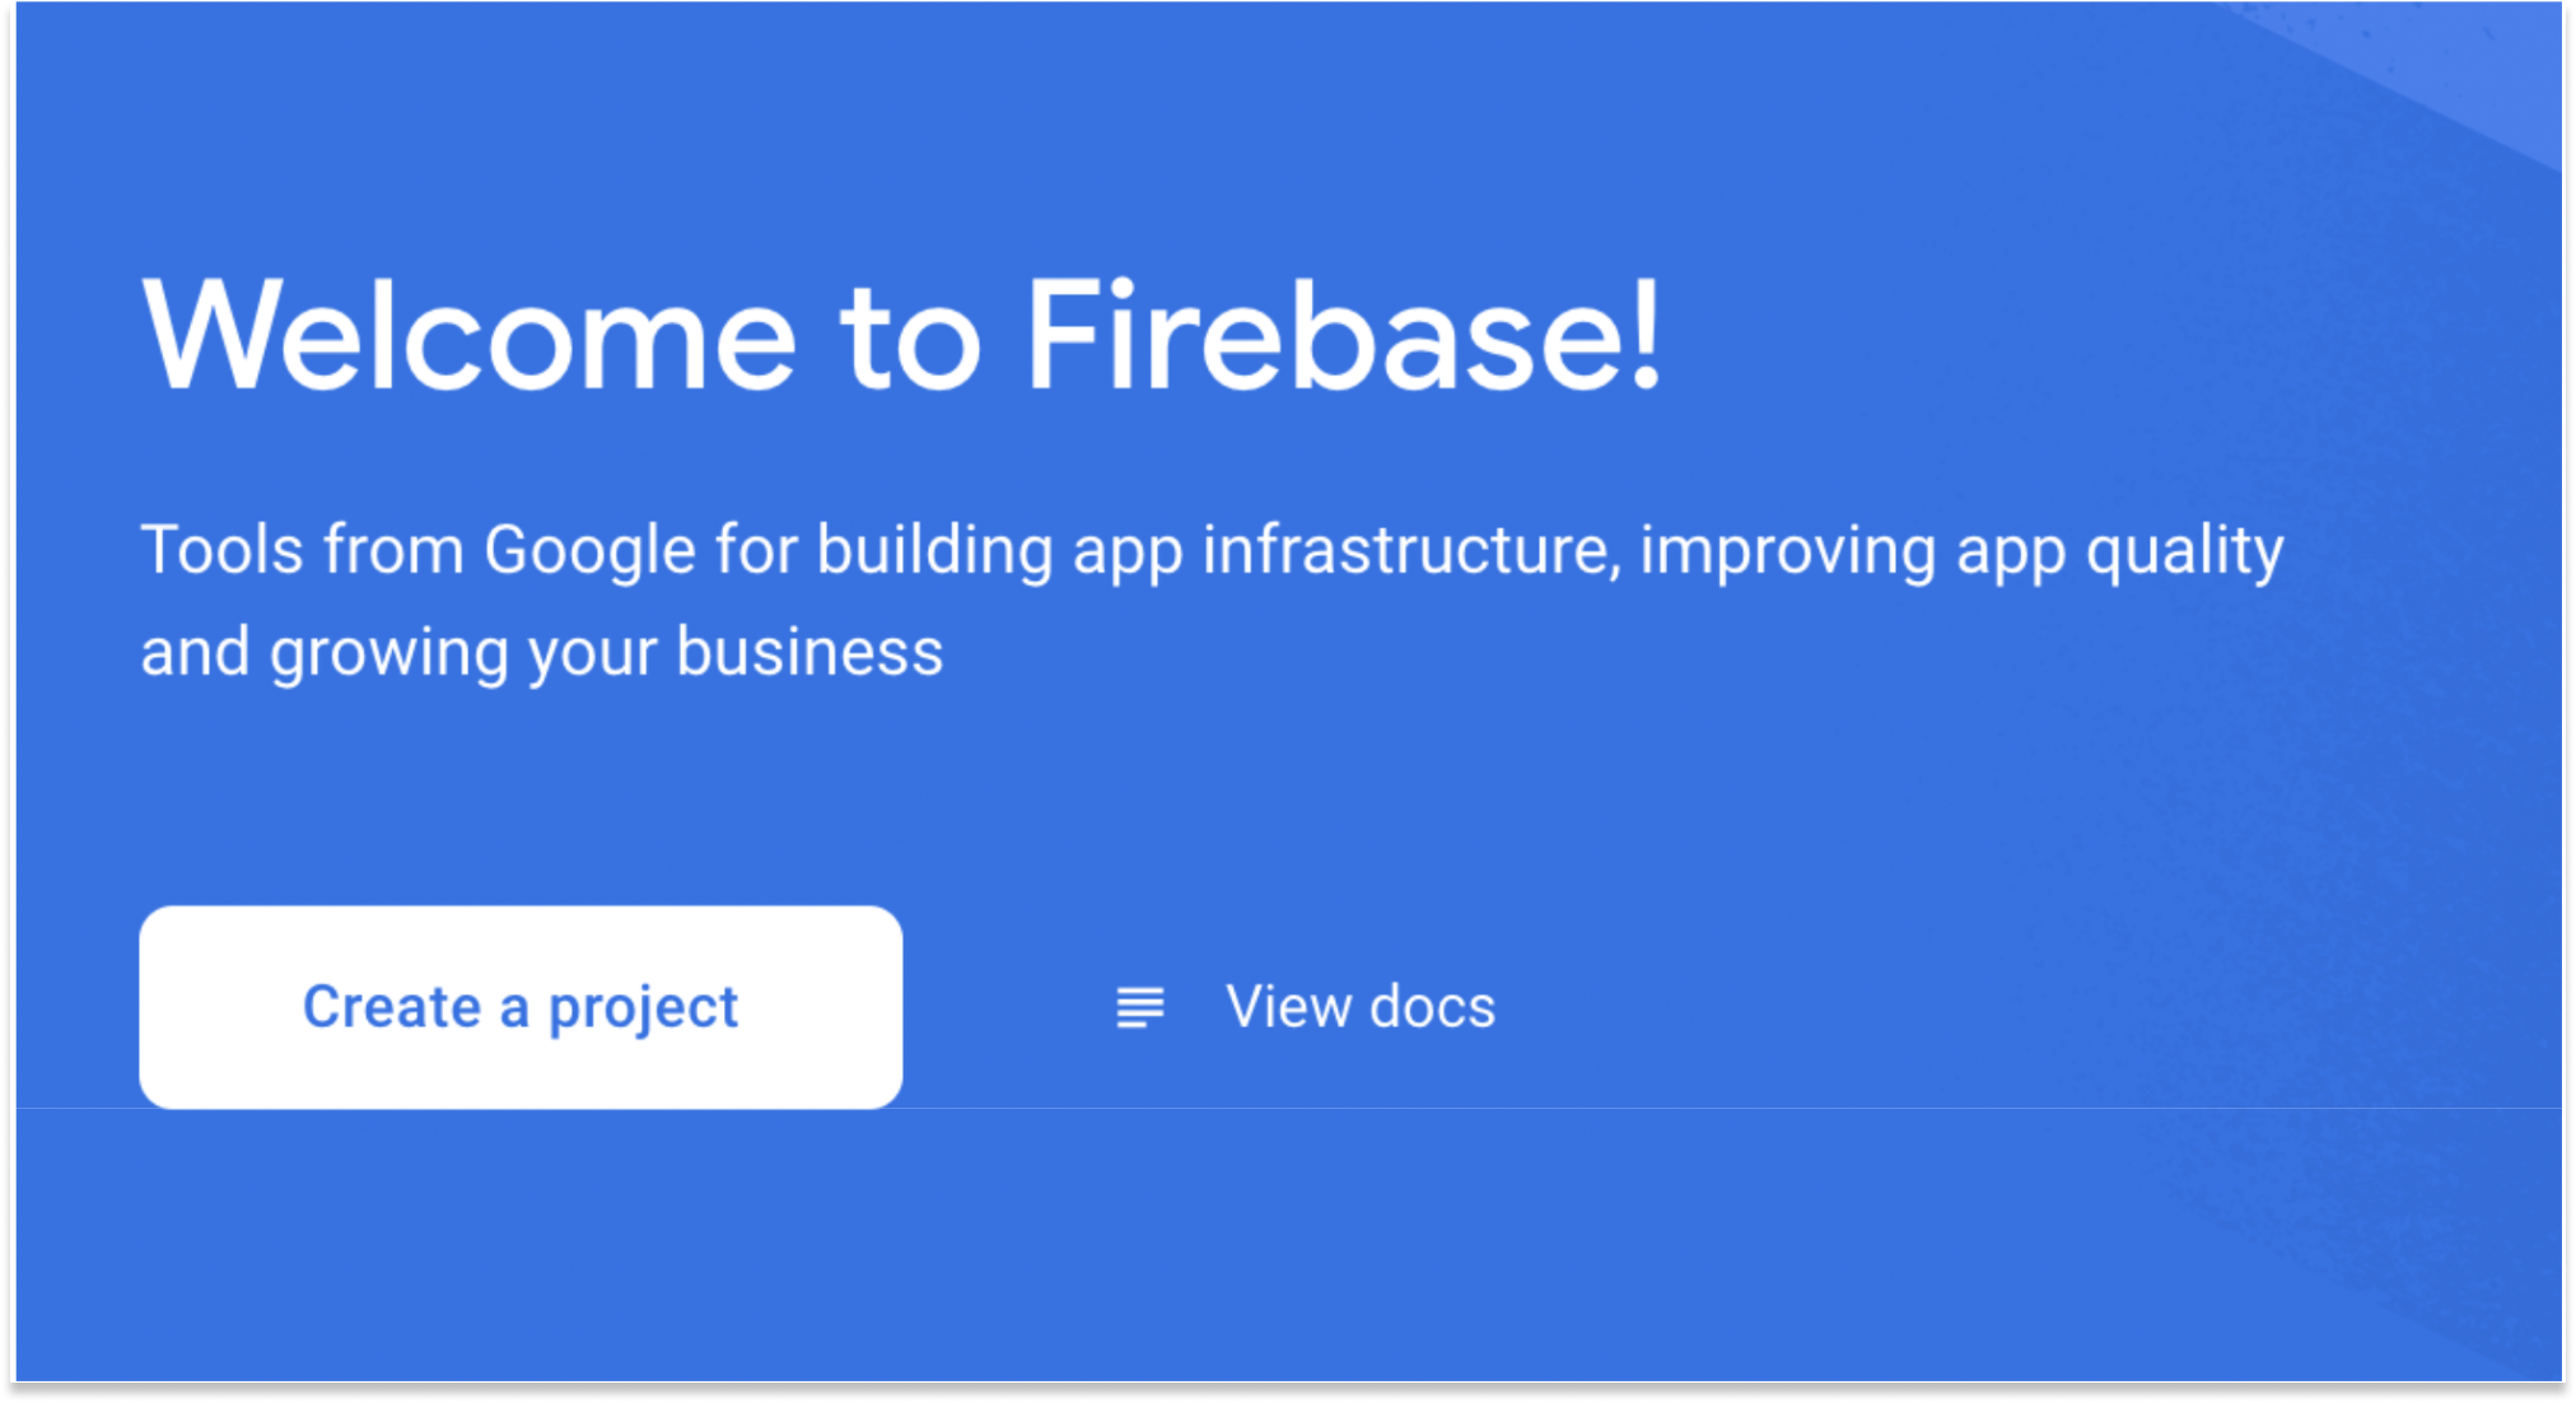
To create FCM Project, Let’s first sign in to Firebase Console. Make sure you use the Google account you want to tie to your project. After logging in, you’ll see 2 options:
1. If this is your first project, you’ll see a button with the label Create a project. Click on “Create a Project”
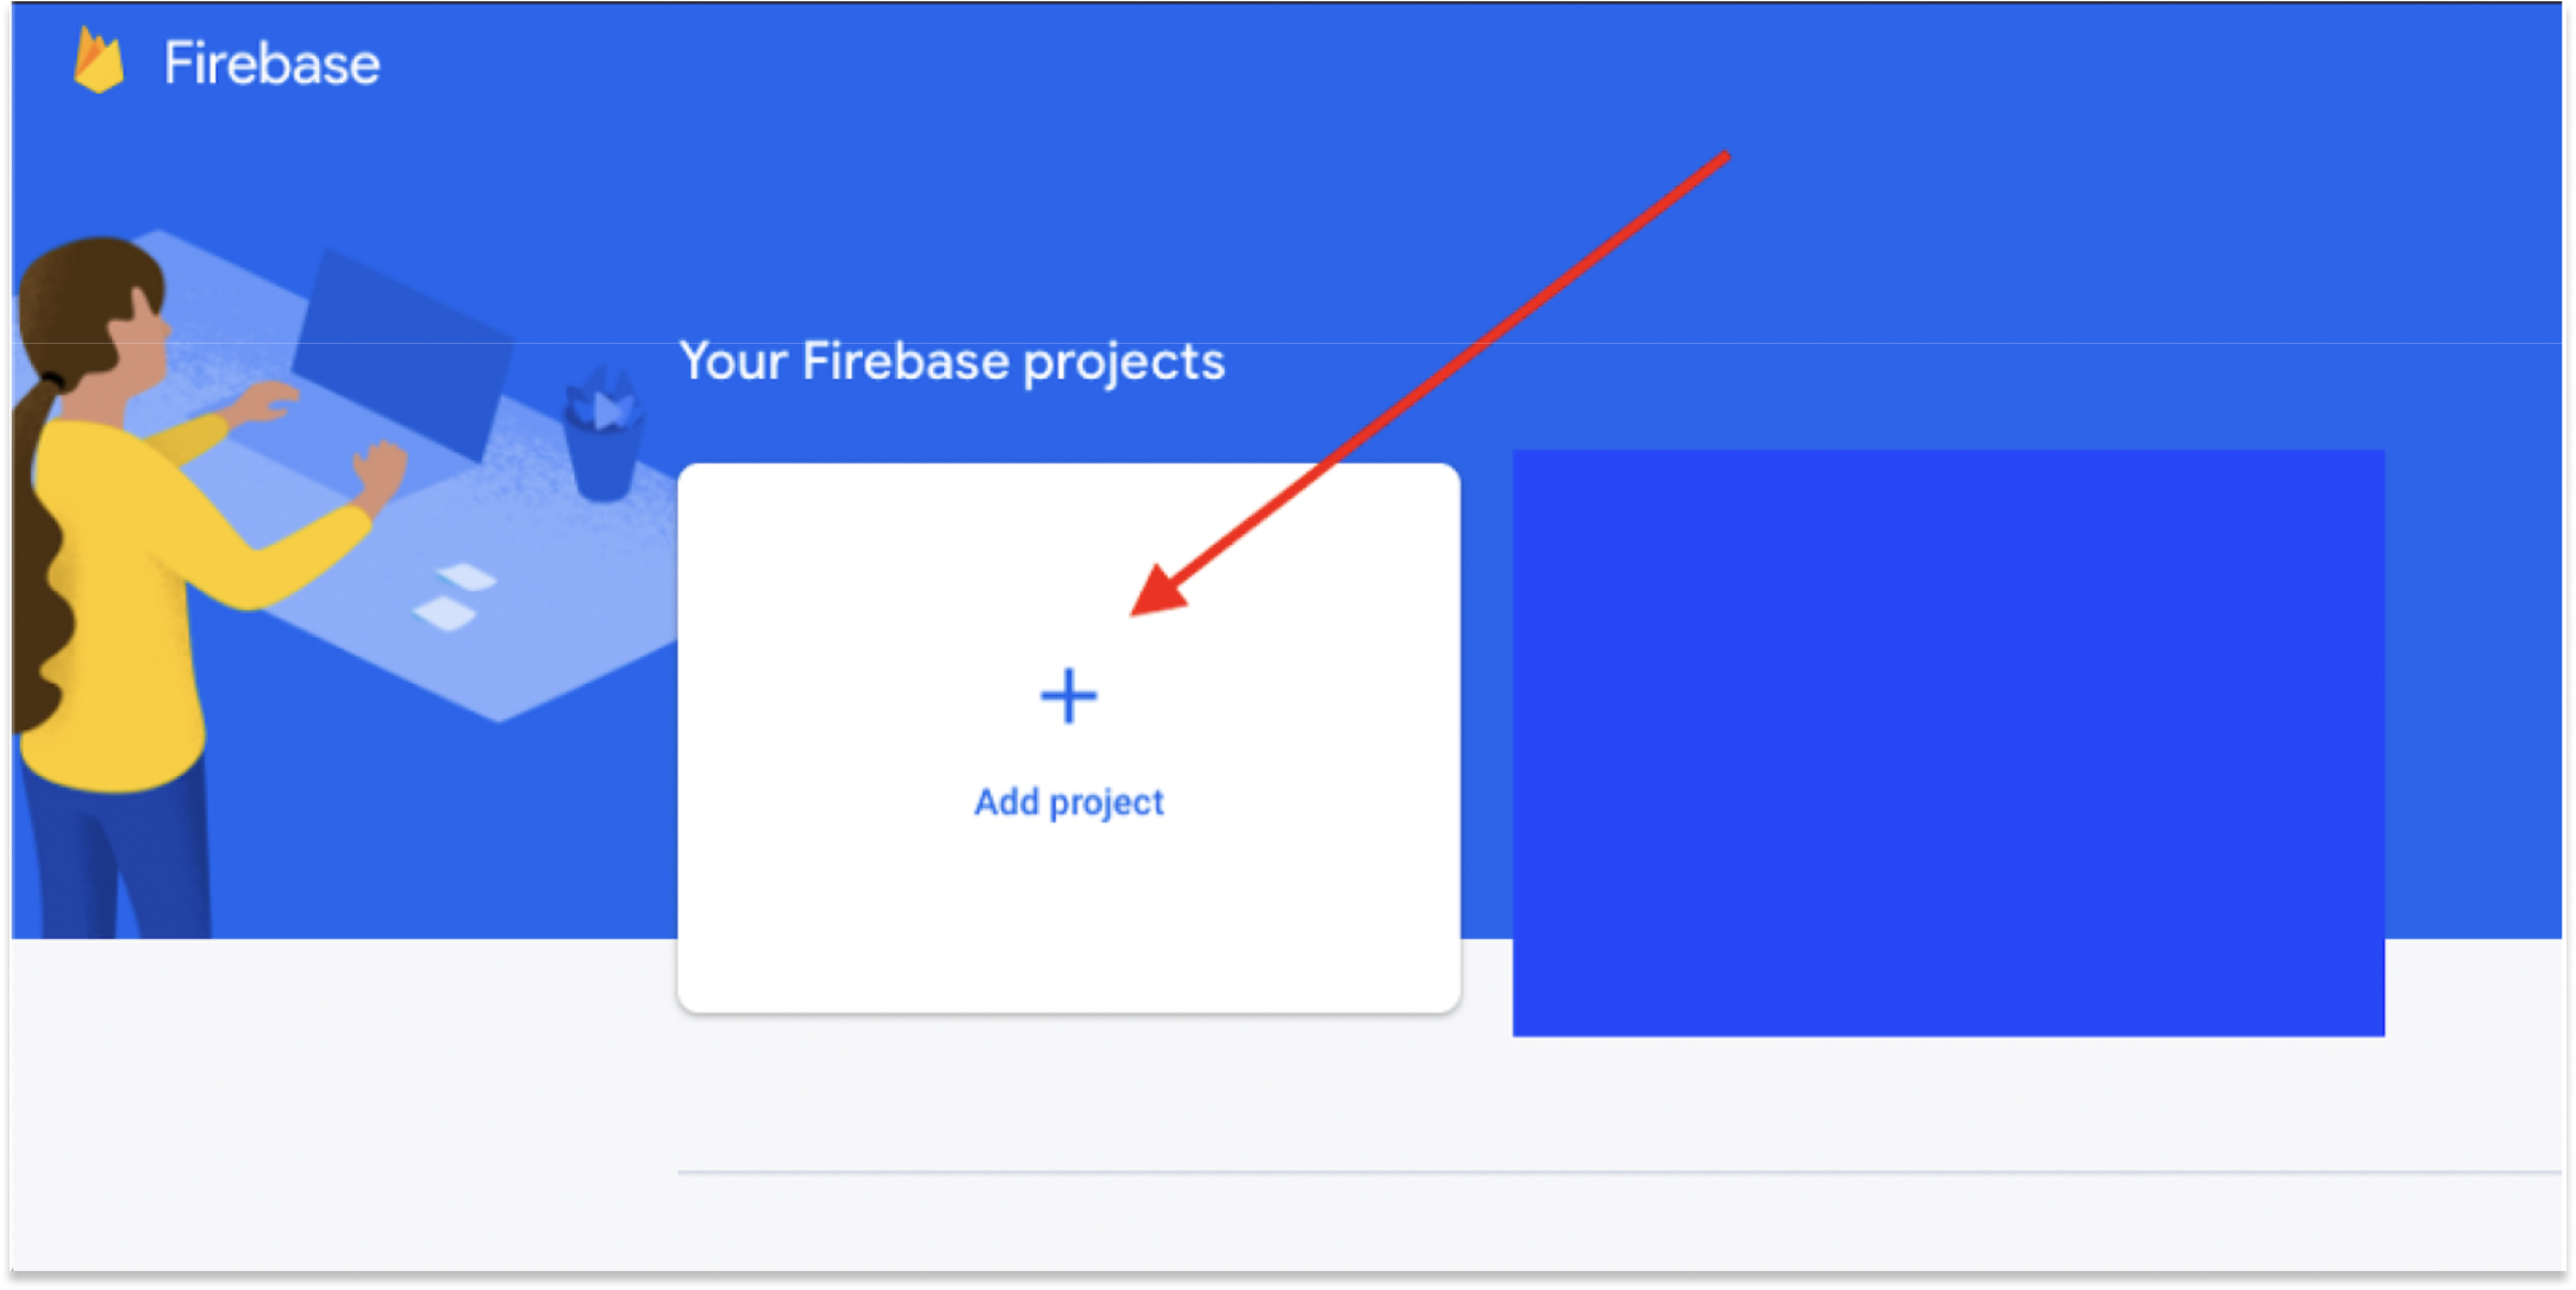
2. If you’ve already started other projects, you’ll see a list of your existing projects and a button with the label Add project. Click on “Add Project”
3. Once you get to the next screen, give your project a name. You can add any name since it will be needed just to identify your project. For this blog, we’ll name it “AwesomeName”. After adding the name, accept terms of service and Click on “Continue”.
.png)
4. Next, you’ll see the option to enable Google Analytics for your project. This is an optional step. Enable it to track notification performance, like delivery rate, open rate, click rate and more. Click on “Continue” to proceed to the next step.
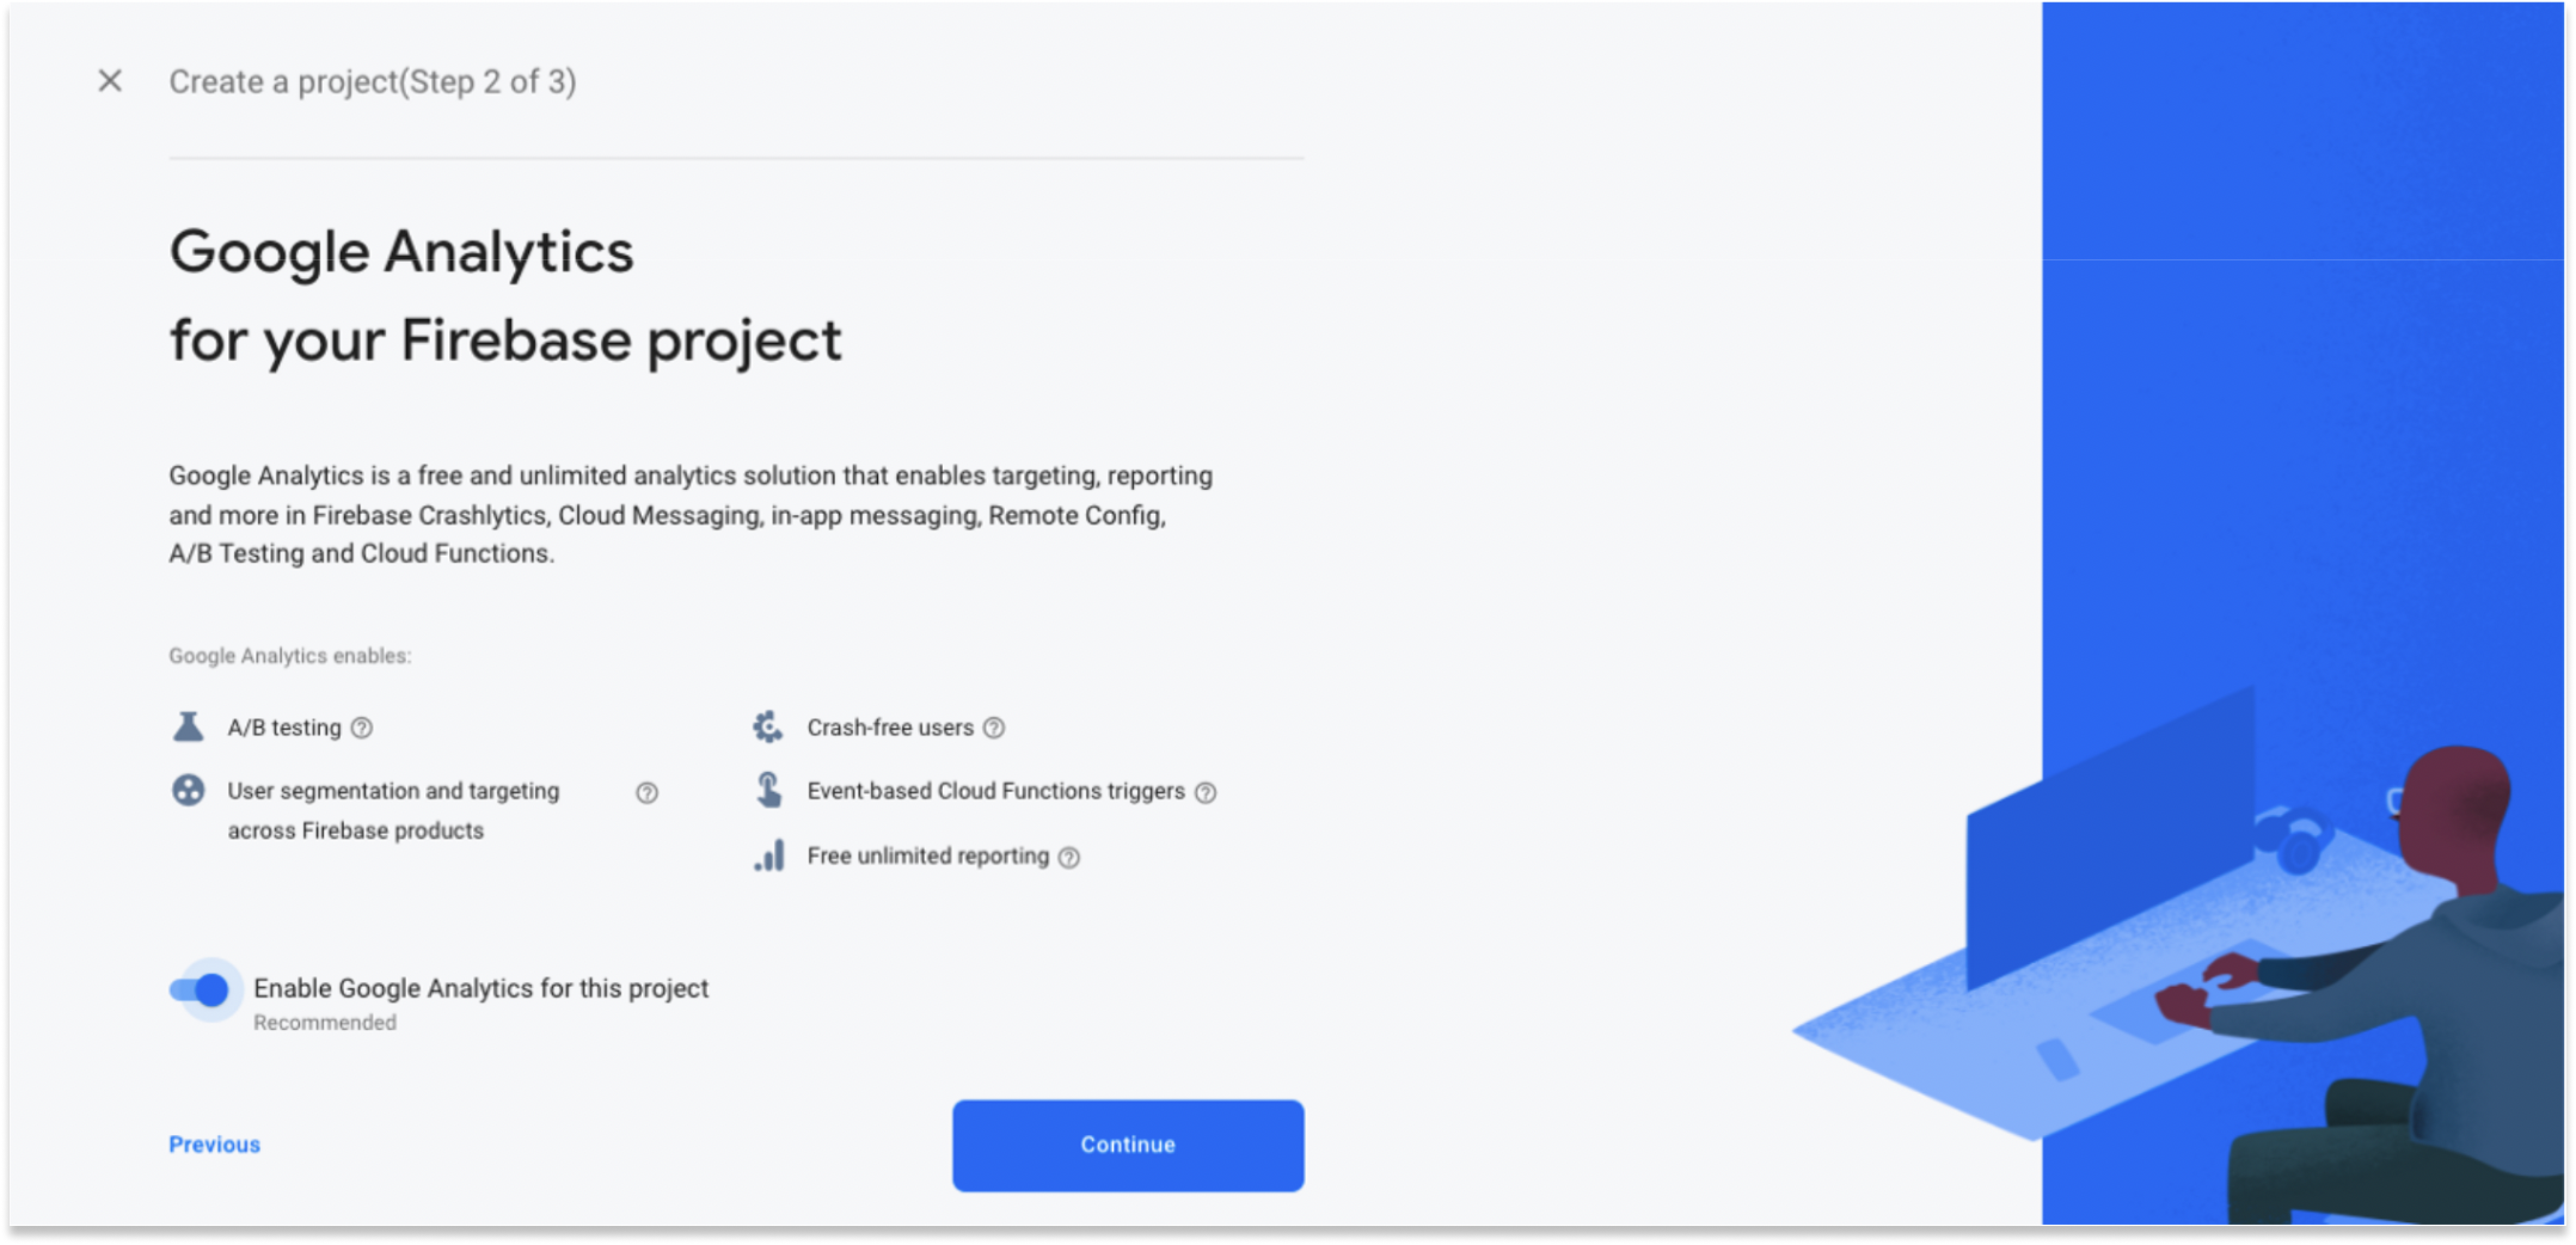
5. Choose your Google Account where you would want to configure your data. If you don’t have an existing google analytics account, select “Default Account For Firebase”. This will create a default firebase property in your google analytics account.
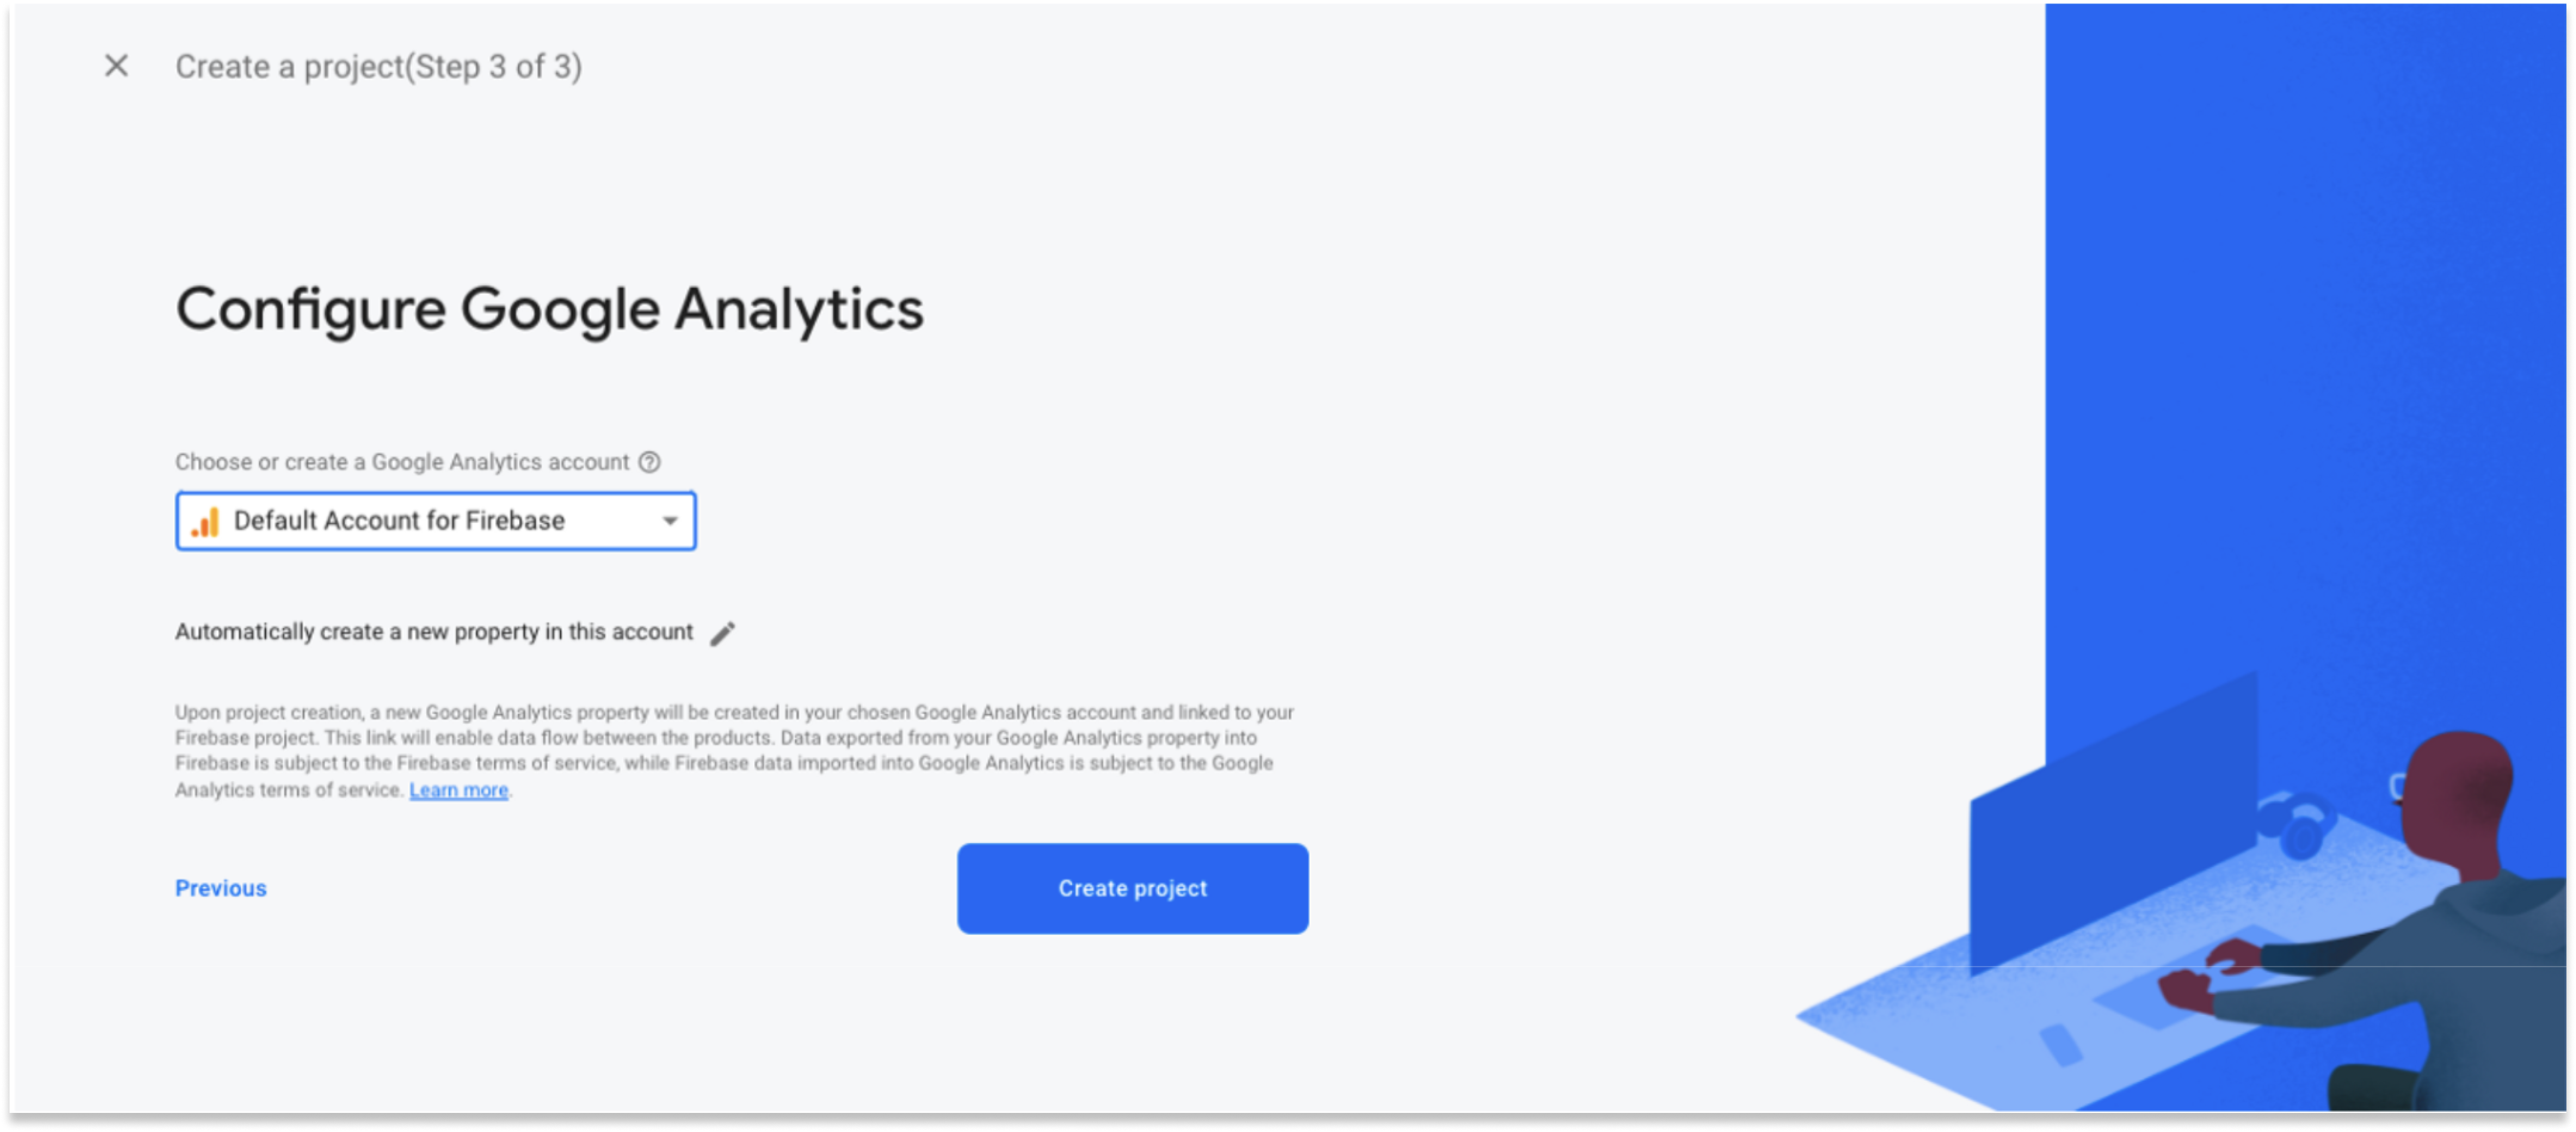
6. Finally, click on “Create project” and wait until it’s ready. You’ll see a similar image like the one shown below once your project is ready.
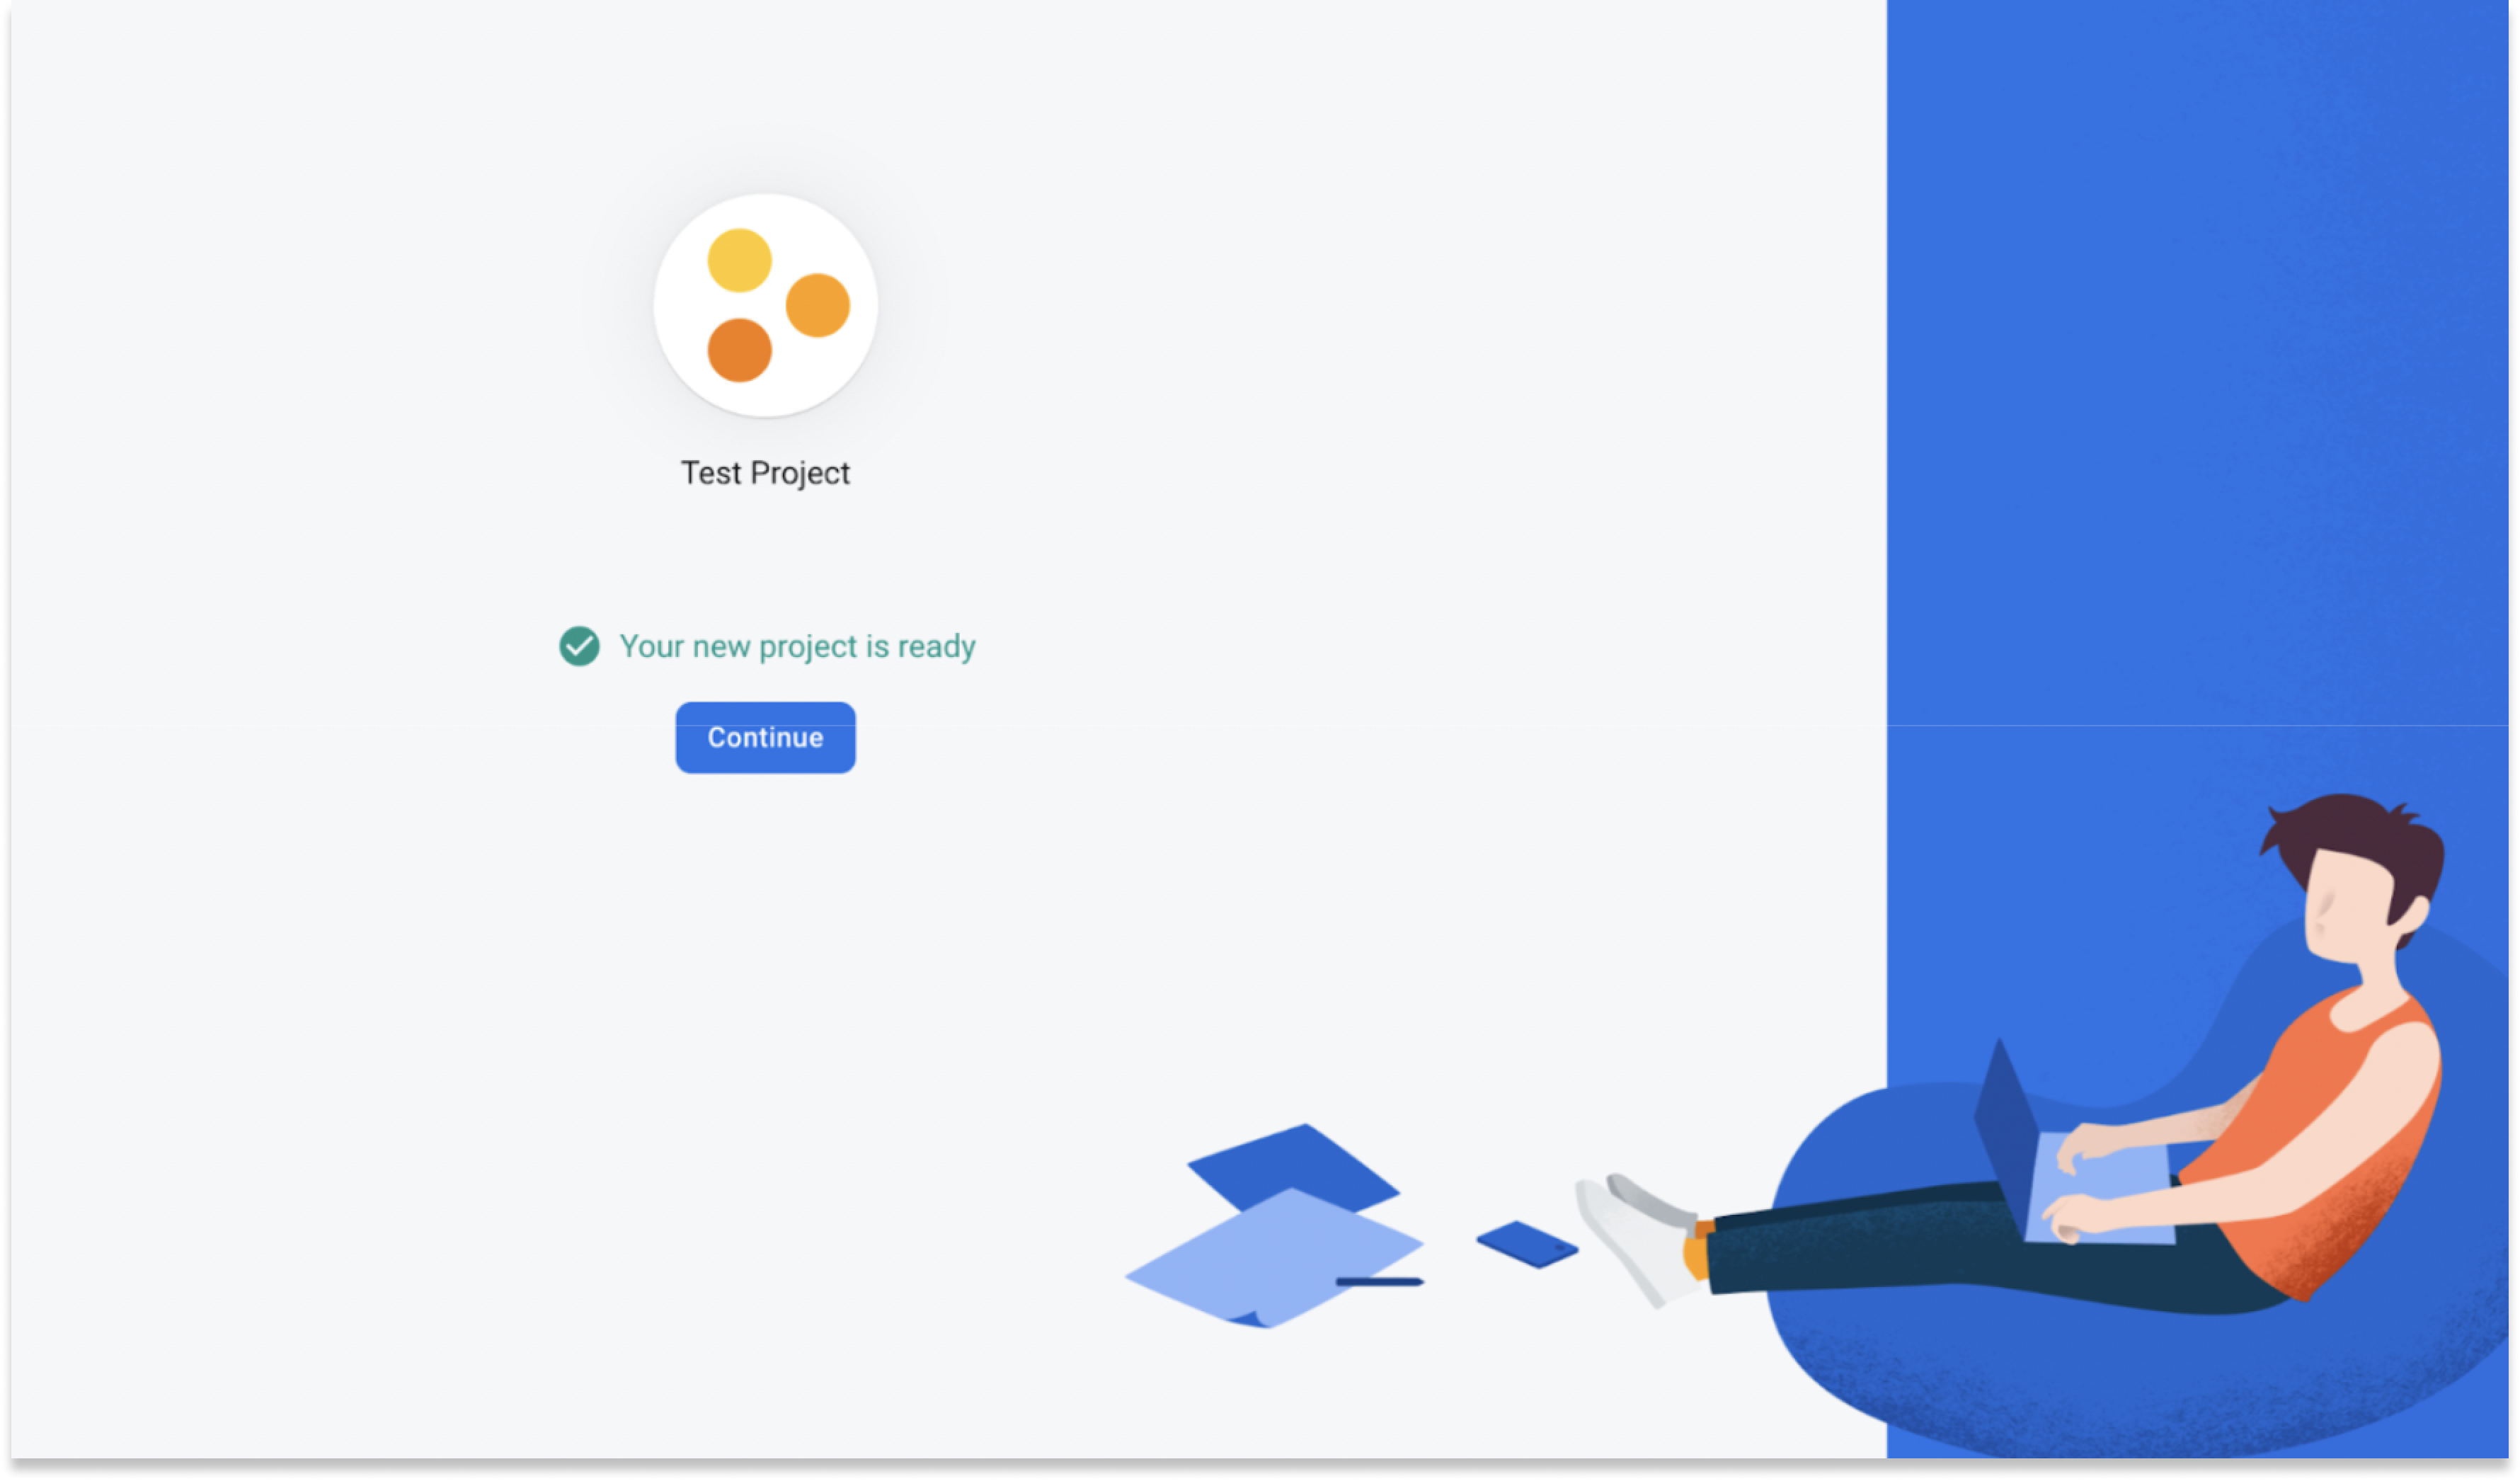
Congratulations, you just created a Firebase project that works for Android, iOS and web!
Click on “Continue” to move to the 2nd step
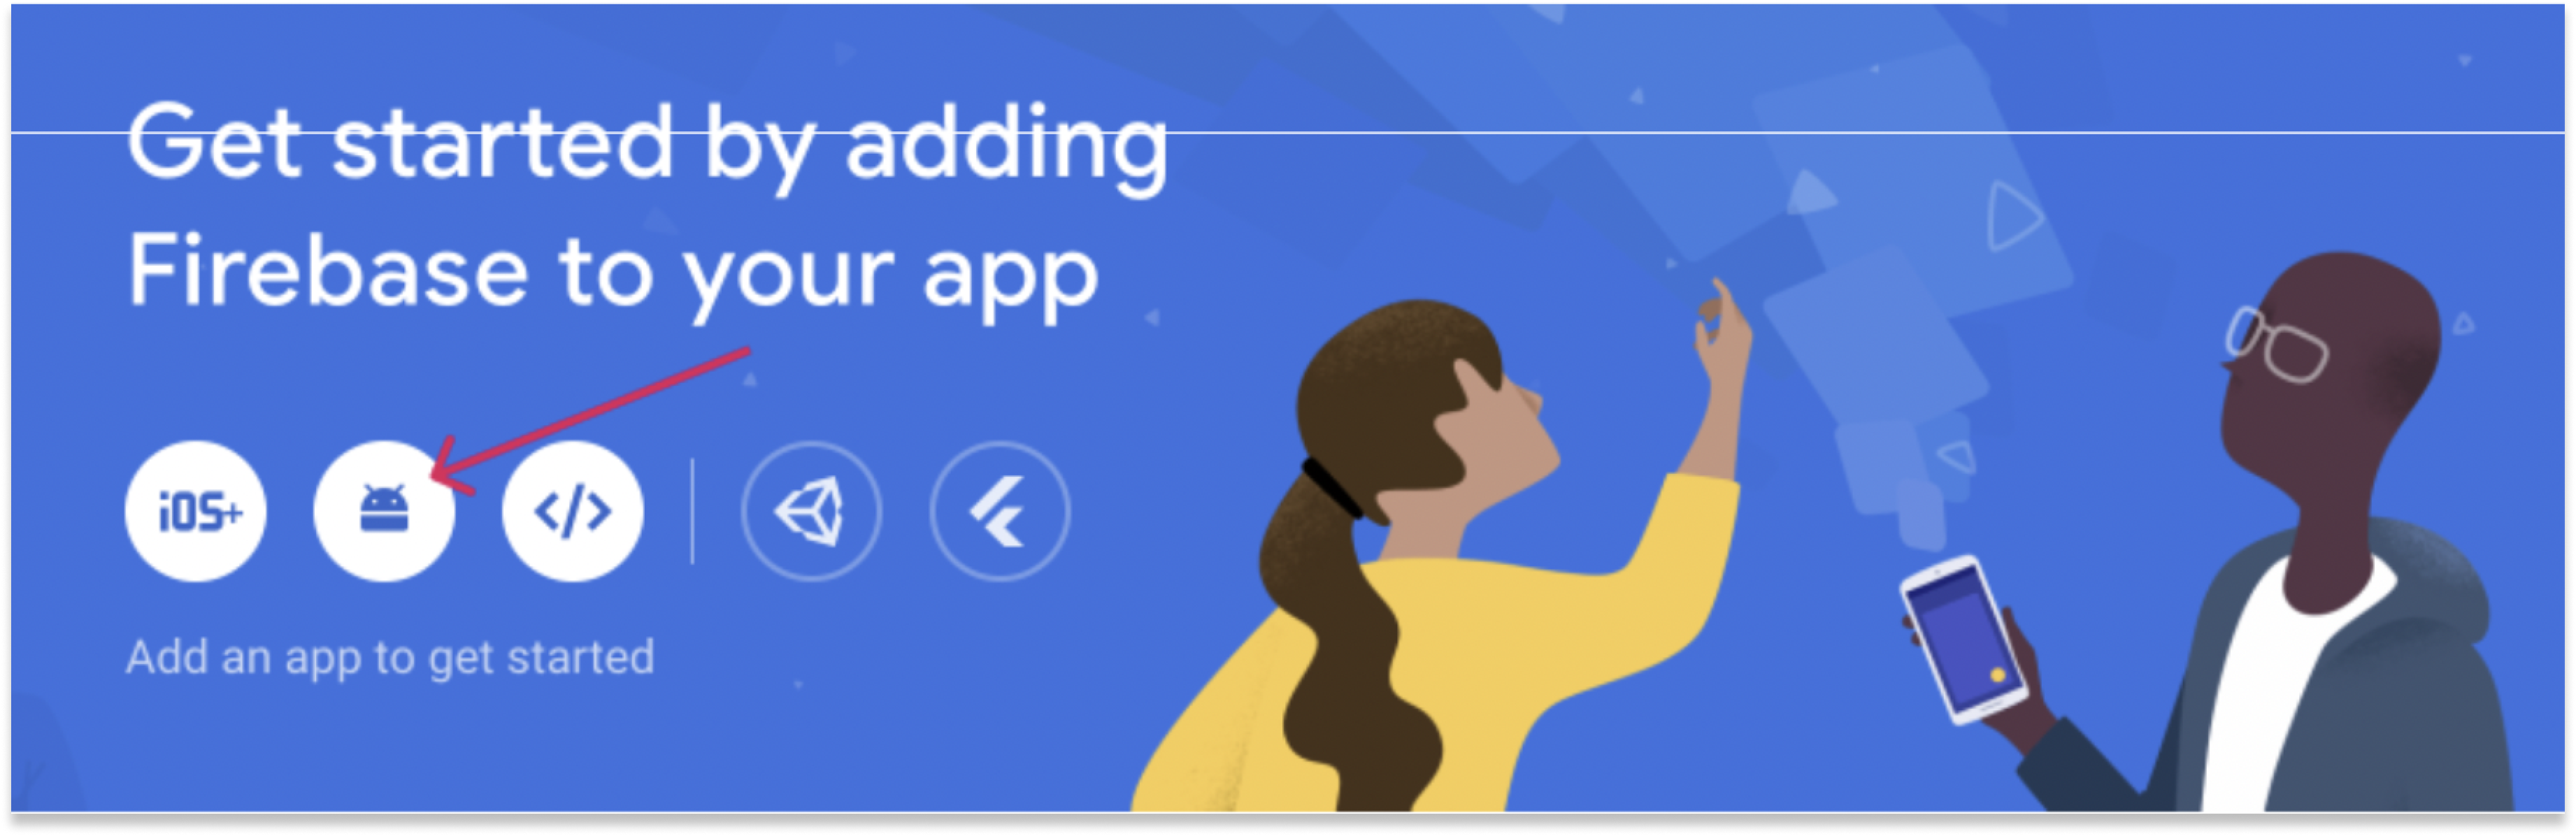
Step 2 — Register your Android App with Firebase console
On the project homepage, you’ll see an android app icon.
1. Click the “Android button” to start integrating your android app
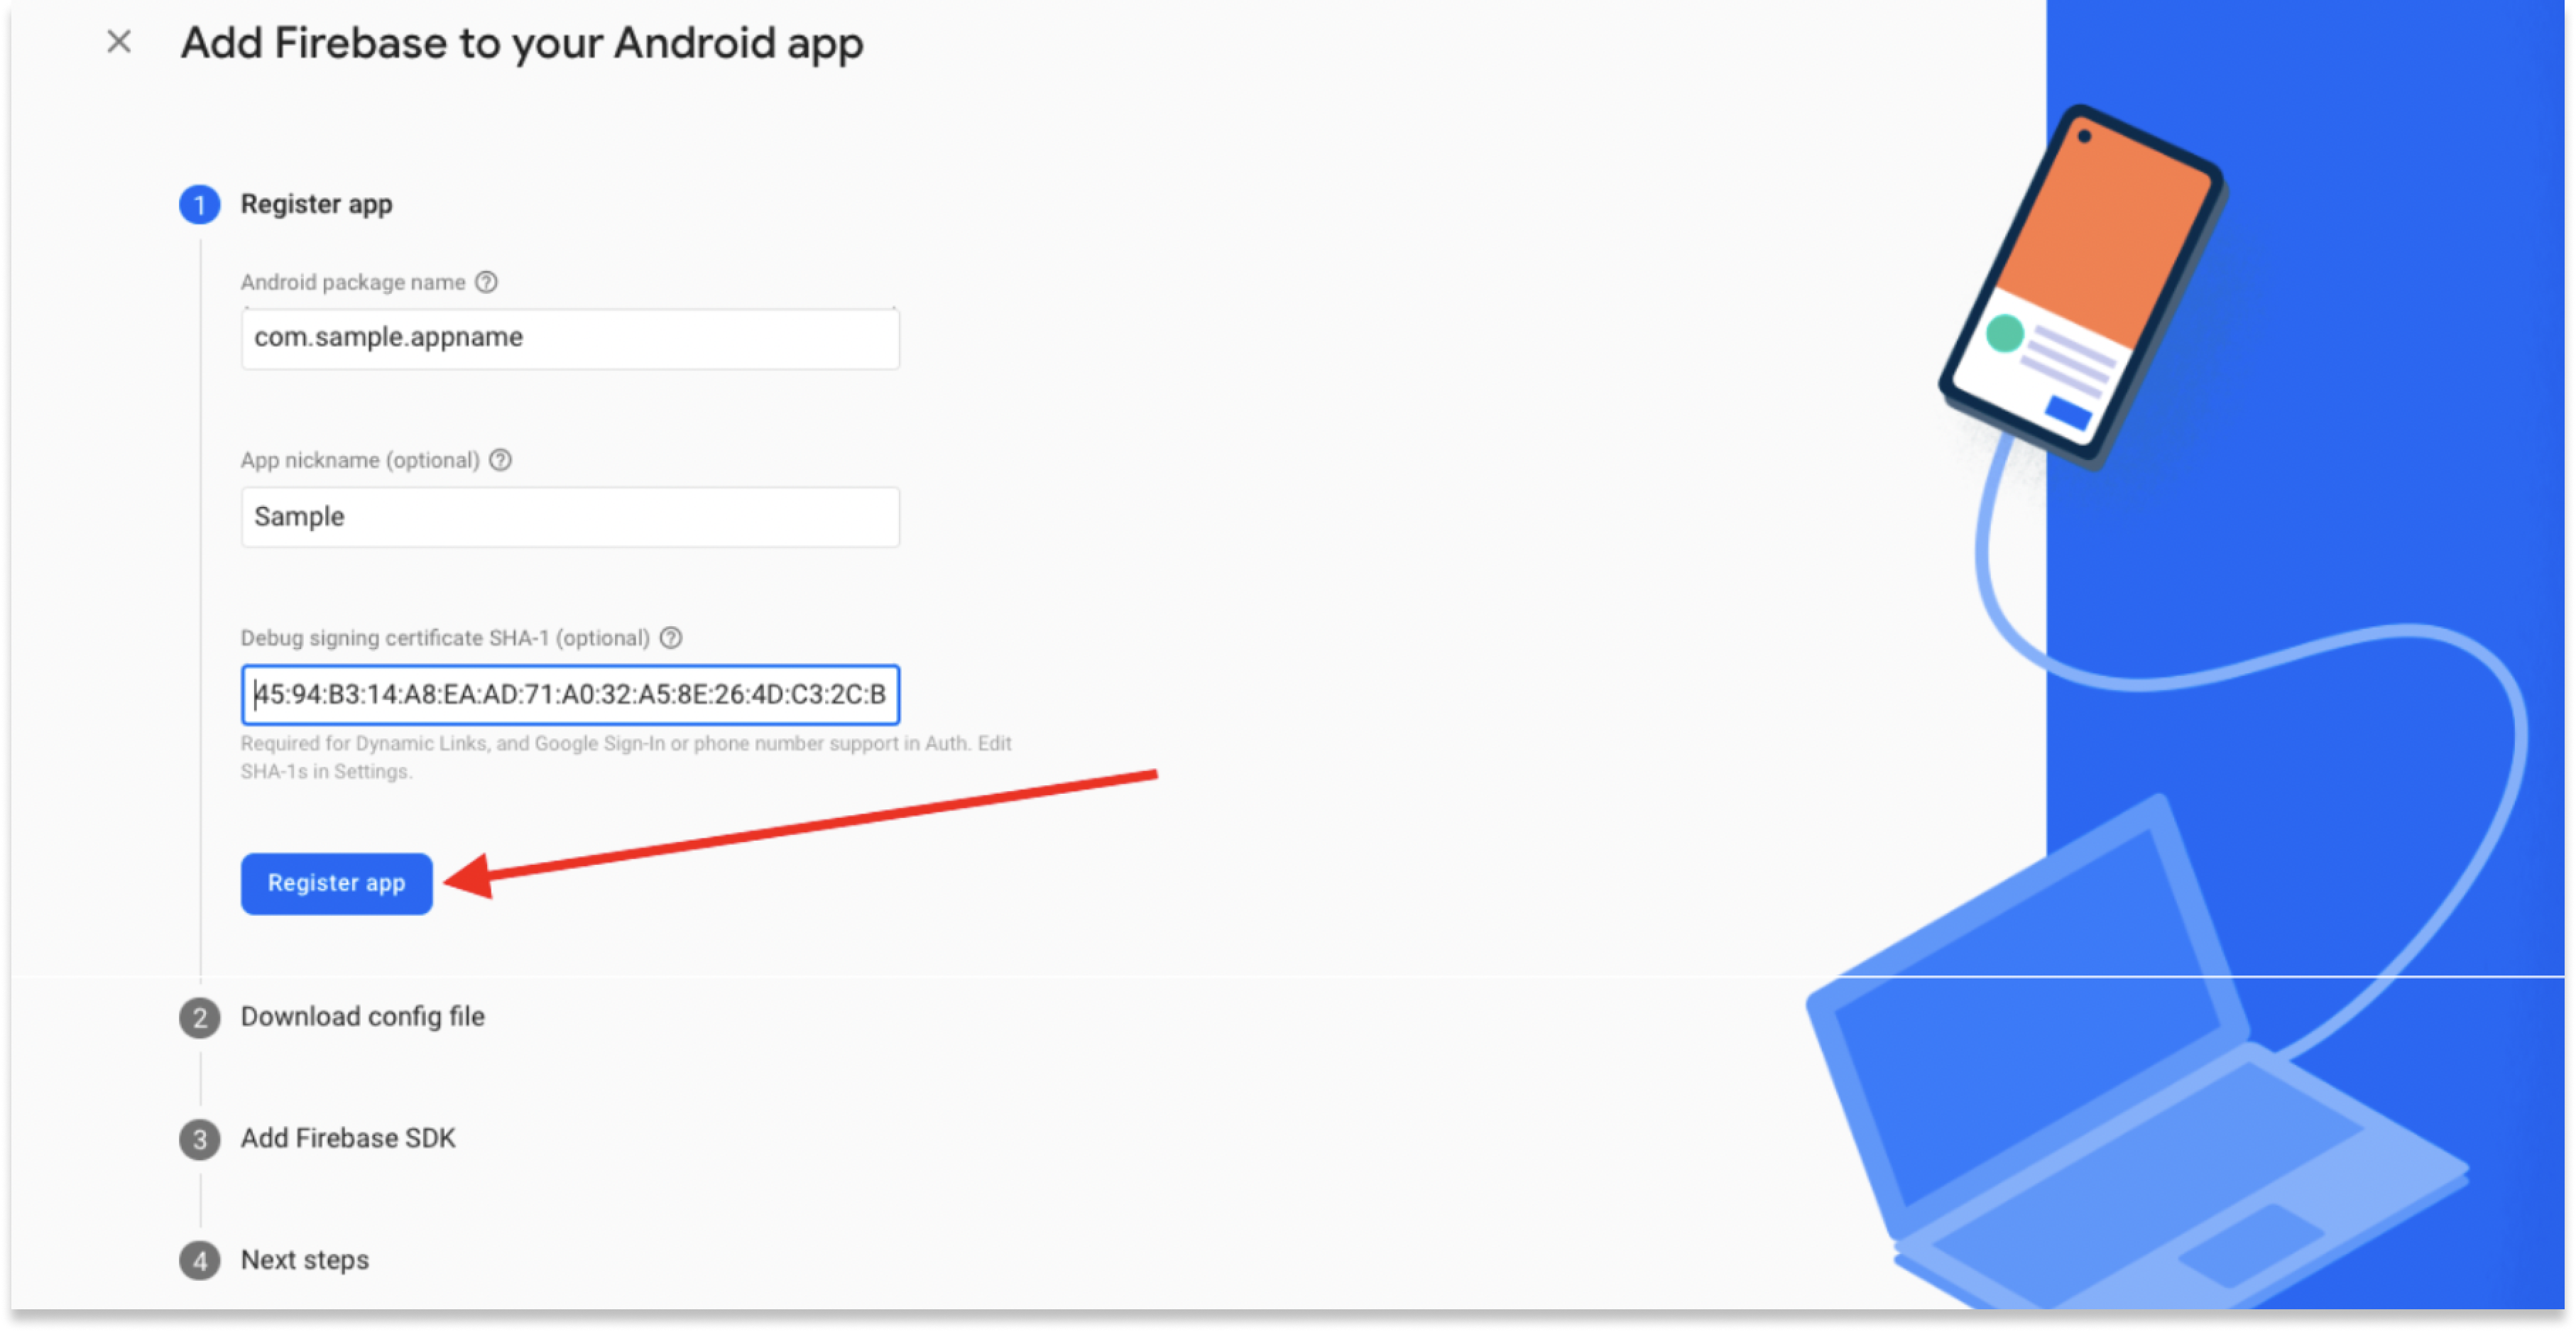
2. This will open the register app page. Enter the following information:
- Android package name - You can find this in your app level “build.gradle” file
- App Nickname (optional) - Provide some nickname for this app. If specified, the app nickname will be used throughout the Firebase console to represent the app. This nickname isn’t visible to users.
- Debug signing certificate SHA-1: Add your debug signing certificate SHA-1. "keytool -list -v -alias androiddebugkey -storepass android -keystore ~/.android/debug.keystore)” or “./gradlew signingReport"
Click on “Register App” to proceed to the next step
Step 3 — Add firebase configurations to your Android App
This screen prompts you to download a JSON file that contains the service configuration for Firebase. Download the JSON file google-services.json and put this in your app folder by following the below steps:
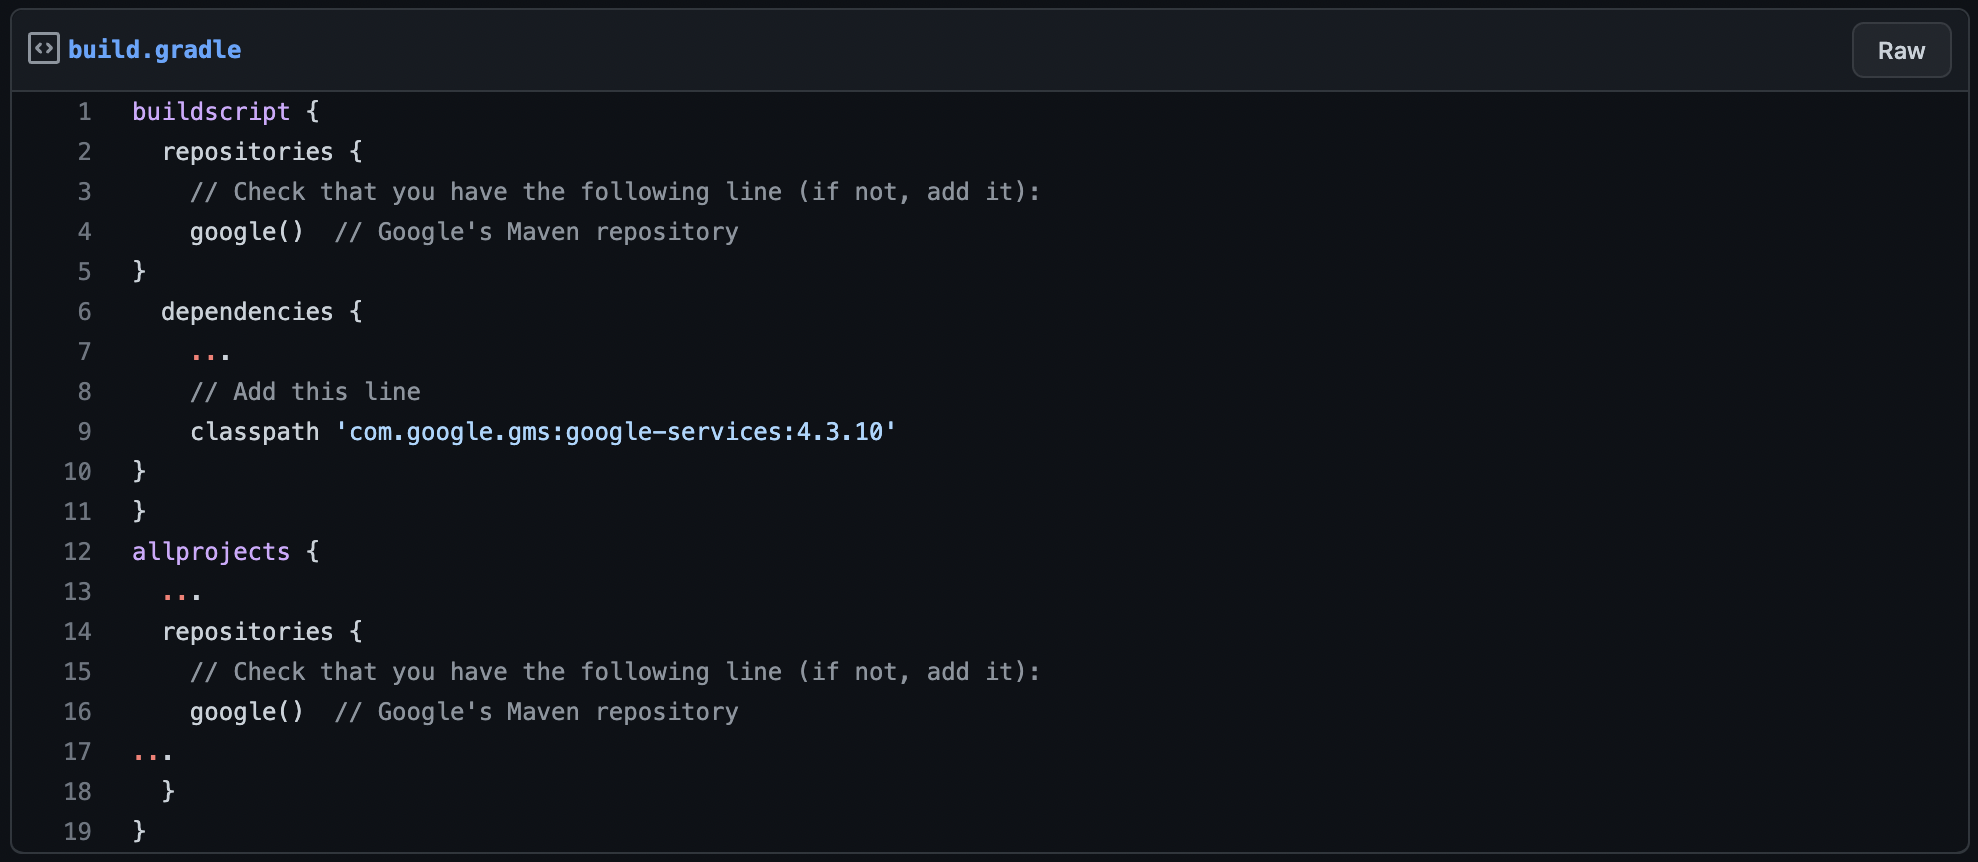
1. Open build.gradle at project level (project/build.gradle)
• Add google() to buildscript and allprojects repositories
• Add classpath ‘com.google.gms:google-services:4.3.10’ to dependencies
2. Open build.gradle at app level (project/appmodule/build.gradle)
• Add apply plugin: ‘com.google.gms.google-services’
• Add implementation (‘com.google.firebase:firebase-messaging:20.0.0’)

3. Click on the “Sync Now” button and wait for the build to finish. This will establish a connection between your application and Firebase project

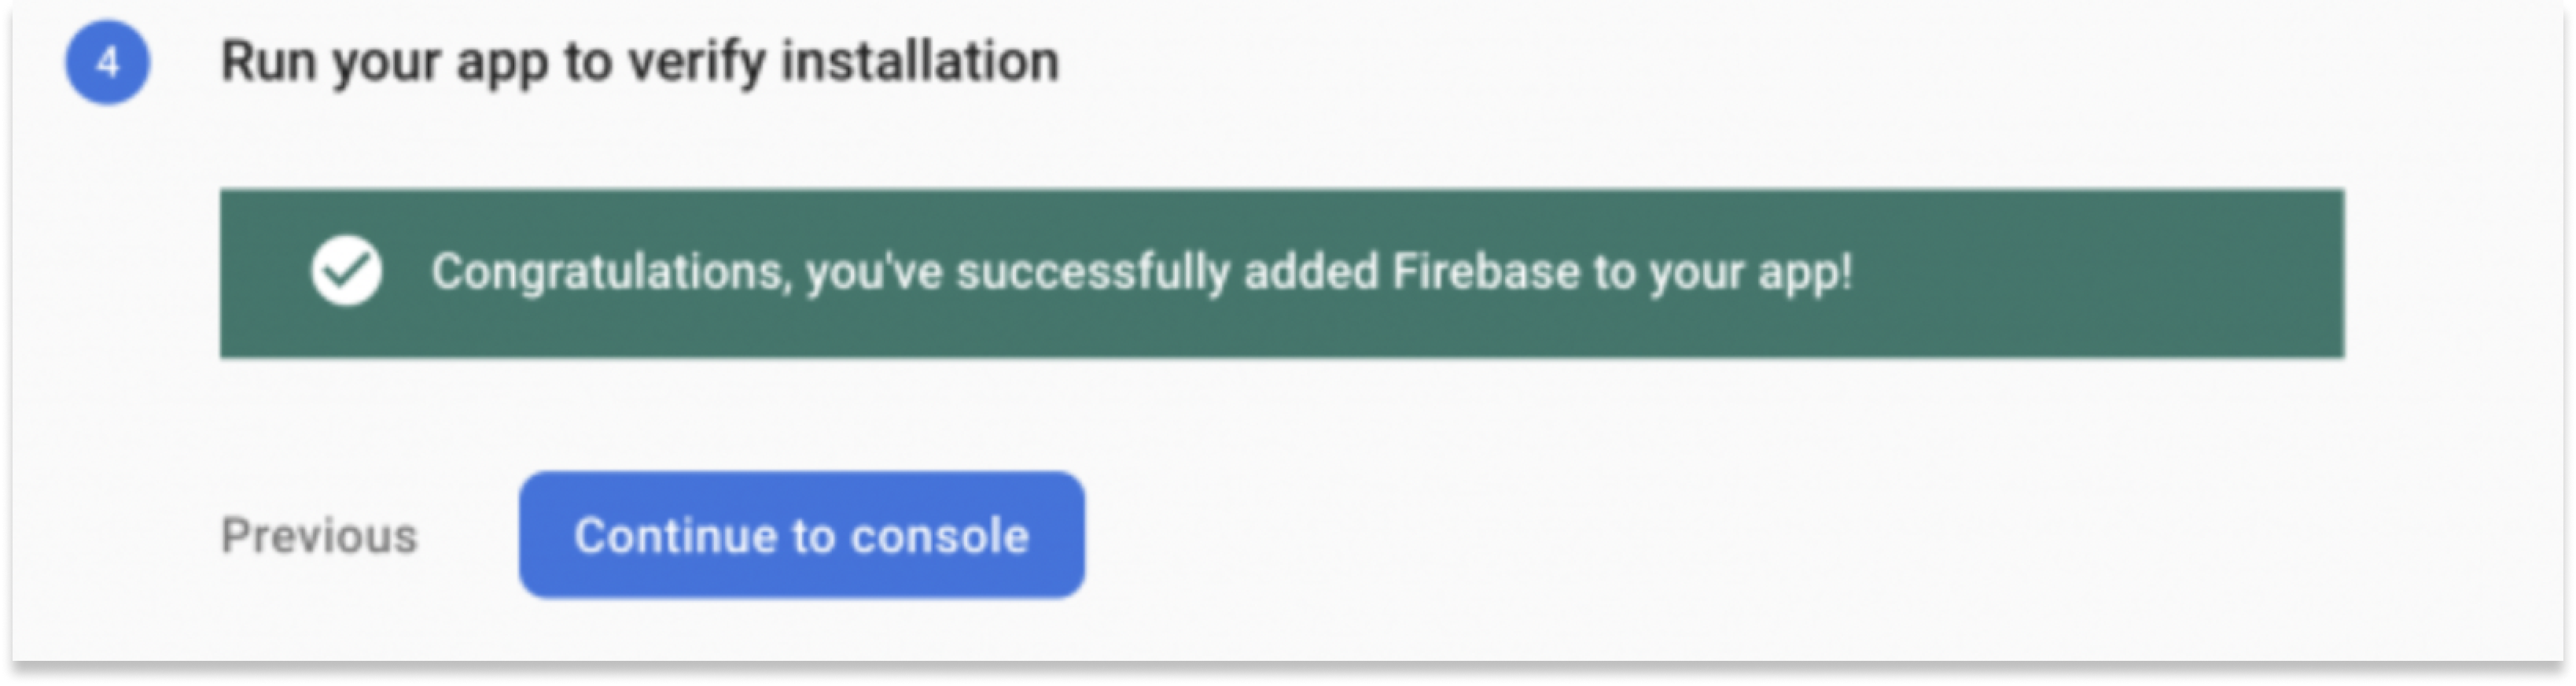
4. Now go back to Firebase console and click “Next” on the screen from where you have downloaded the file. You’ll see a small prompt that checks whether your app has connected to the server or not.

5. If the check is successful, you'll see a congratulations message like below. Click on “Continue to console” if you see the success message. Otherwise, recheck if you have followed the integration steps correctly.
6. Register your application with FirebaseMessagingService using this code sample. By registering this service, your application will be able to receive the FCM message payload.
Now your app is configured in the firebase console. Next we will trigger a sample push notification from backend using cURL request.
Step 4 — Sending push notifications from backend
Here’s a sample Curl Request to send push notification from your backend code. Do not forget to replace the key with your server key.
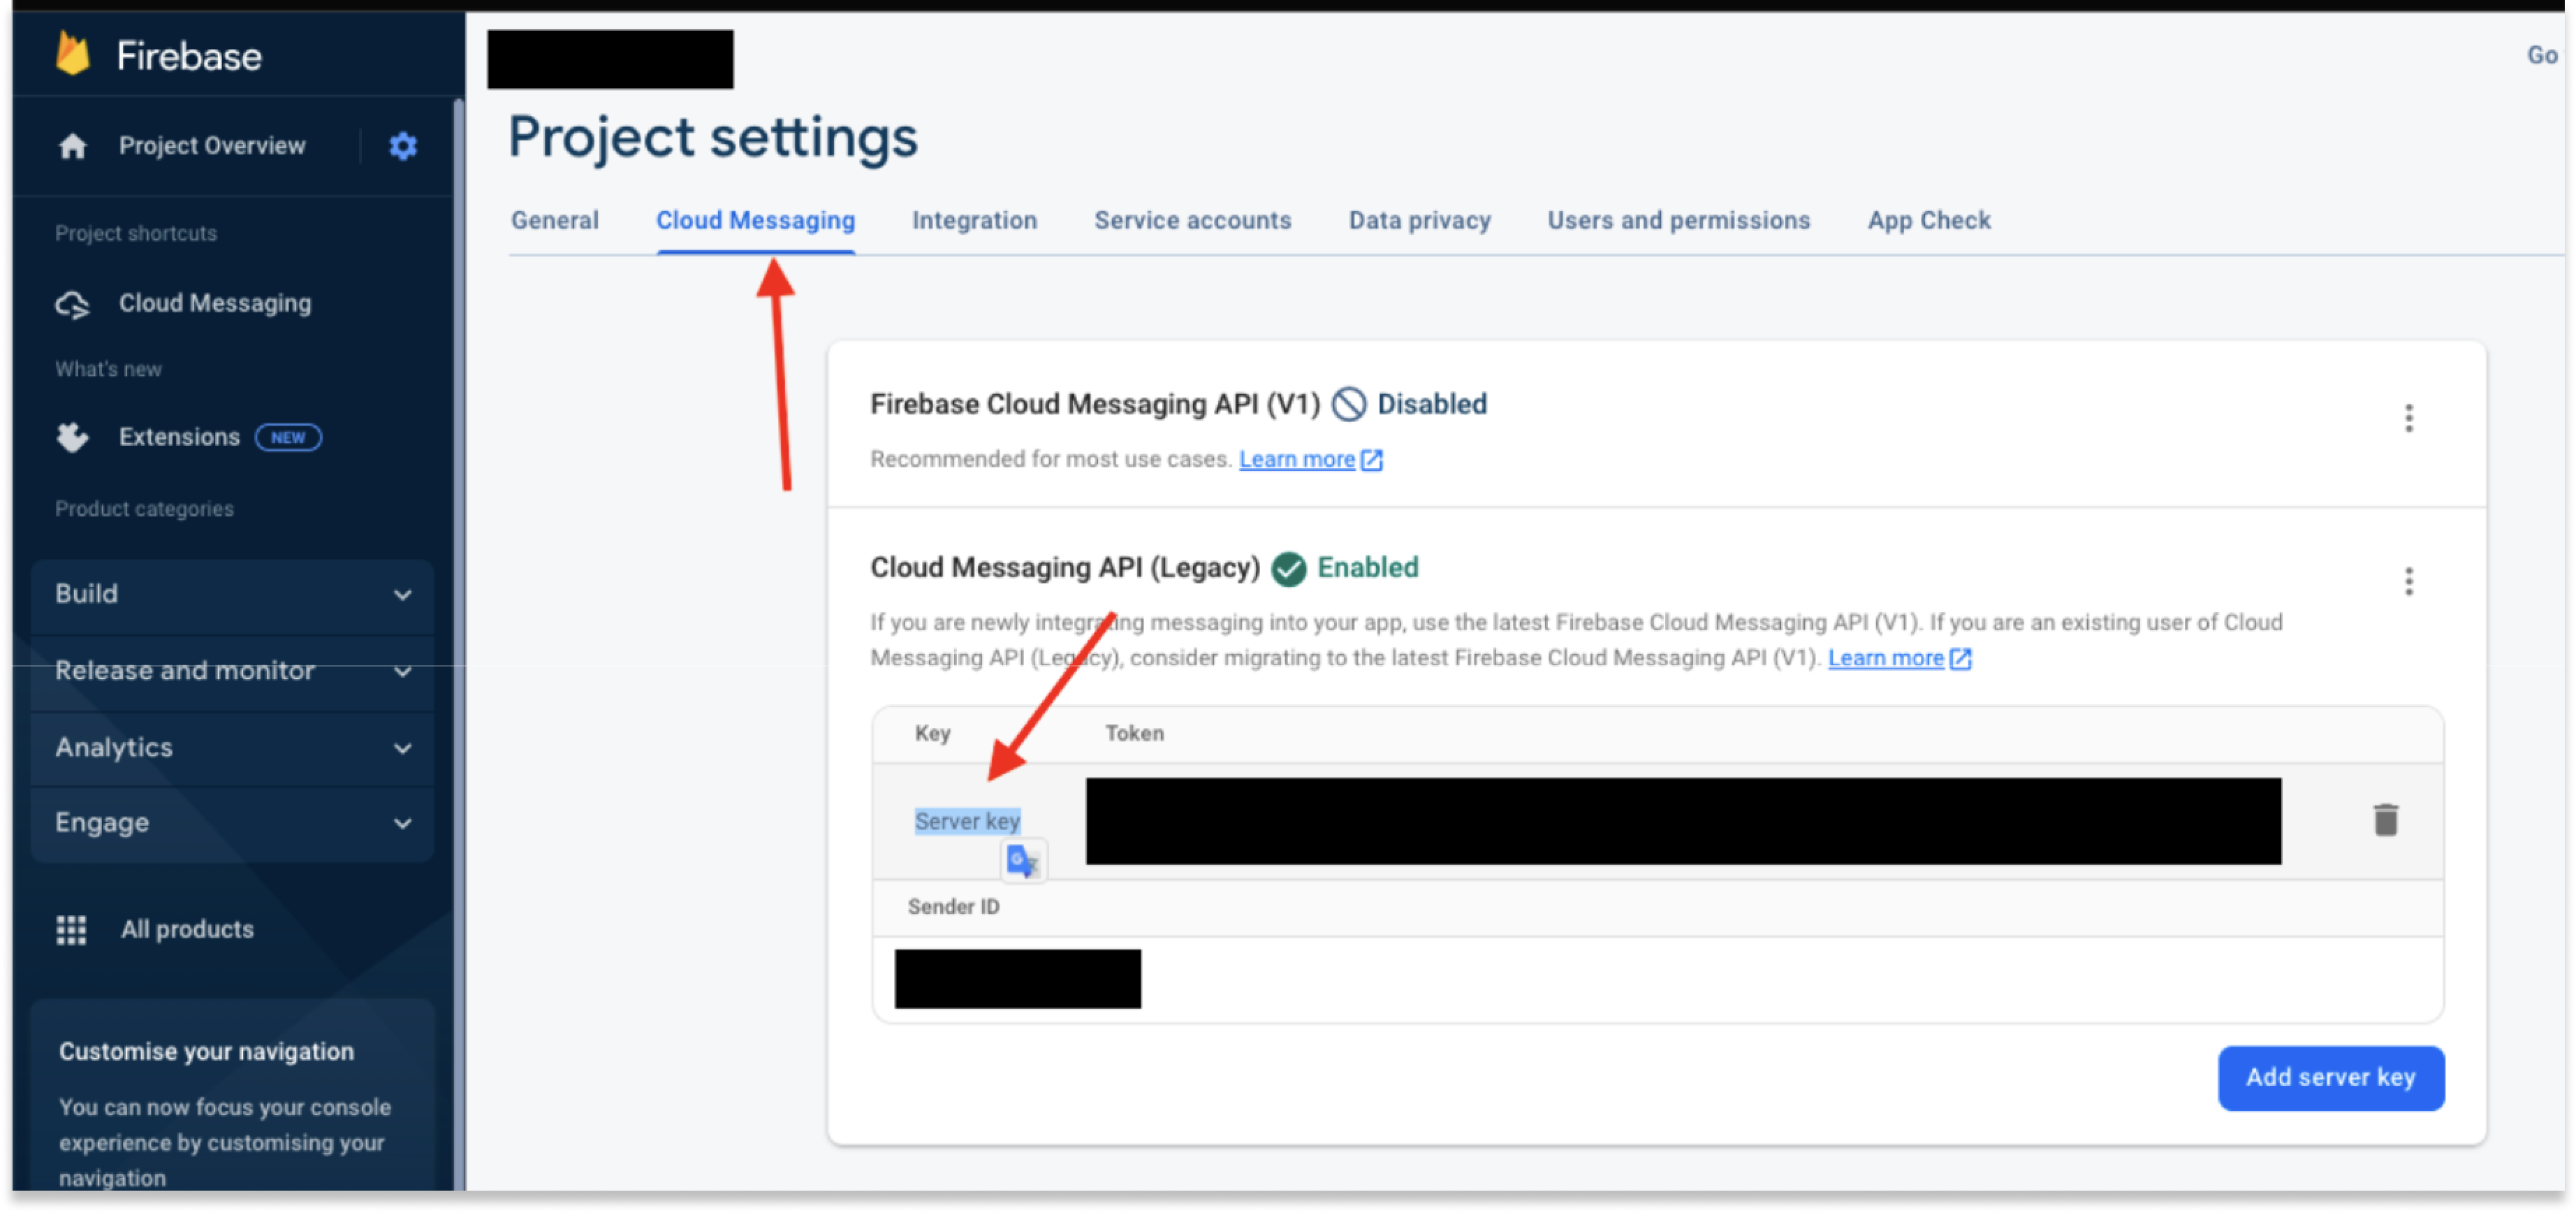
To get server key,
• Open Firebase console
• Go to Project Settings
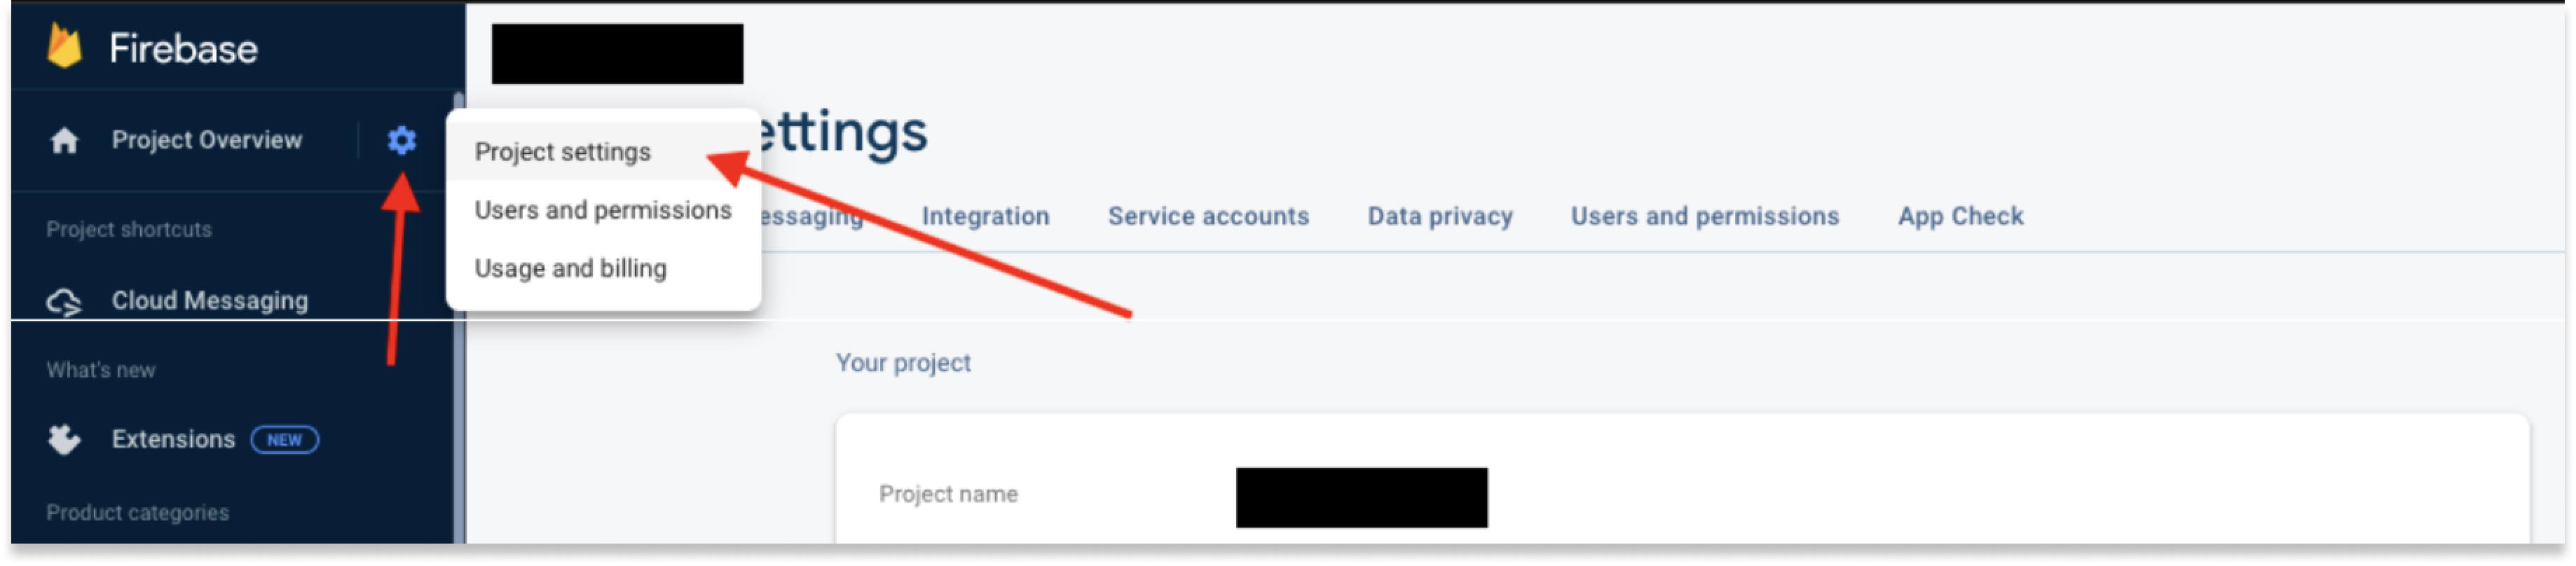
• Go to Cloud Messaging Tab
• Below you will find the server key
and voila…
You just triggered your first notification using FCM.
We have just triggered a simple text message but there are a lot of functionalities and styling options possible in Android push notification. We’ll cover all the advanced configurations and the methods to set those configurations in our next blog.
Send FCM Push Notifications Using SuprSend
You can skip all the above steps and save your effort and integration time. Just integrate SuprSend into your app and leave aside the technical aspect of handling
- Integration of Android Service & Receiver
- Advanced Notification configuration for sending all types of notification content
- Handling Notification support for different Android API Level
- Setting up notification tracking in your backend service
- Handling notifications in background and Foreground mode and much more…
Check step-by-step process to setup push notifications with SuprSend in less than 120 seconds.
With SuprSend, you can start sending notifications to all the channels (android, ios, web push, sms, email, slack, whatsapp, app inbox) with a single API integration. Also, with advanced workflows, you can handle all types of notification use cases such as crons, reminders, digest, multi-lingual messages and so on.
Now, you can focus your engineering bandwidth on solving your core business problem, and let SuprSend handle the rest.Before digging deep into push notification integration, let’s start by answering some basic questions - “What is a push notification” and “What are the benefits of sending push notifications”


