
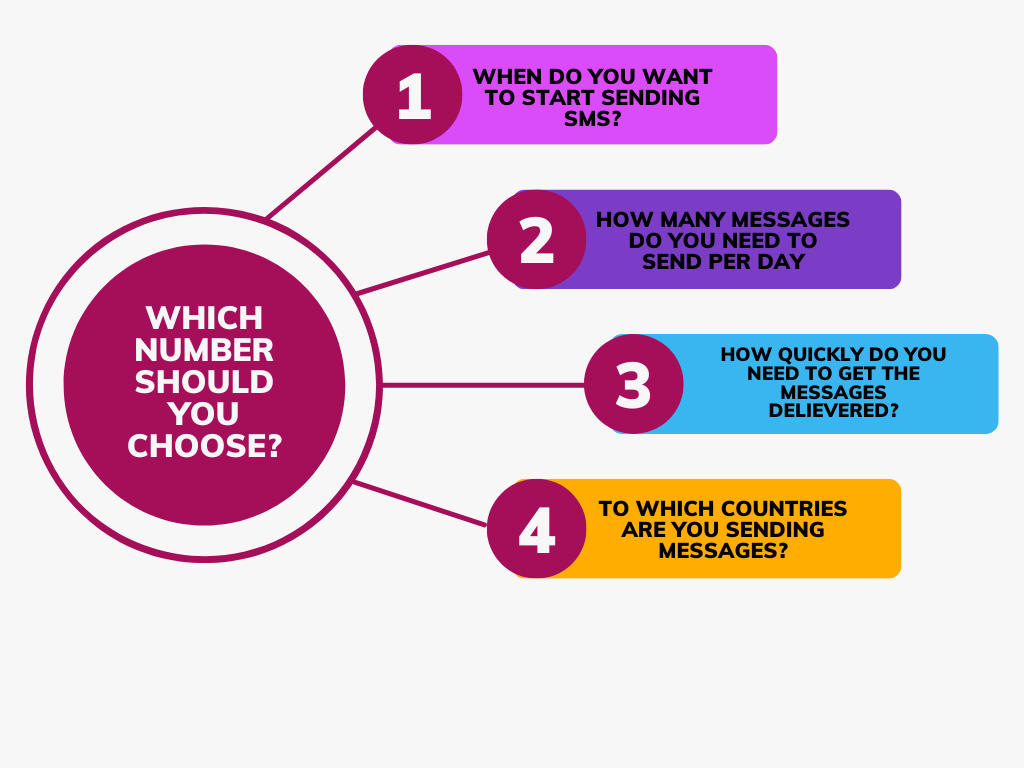
On an average around 23 billion texts are sent in a day, amounting to 270,000 texts per second. A lot of them consist of alerts and information that companies send their users.
This blog will list 4 major ways of sending text messages (SMS) using python through different service providers, with a comprehensive code guide for each to get you started with your SMS needs.
Text SMS are broadly done in two prominent ways, either by installing SDKs of the SMS providers or by using their pre-established APIs.
Let’s start with a well known company for the Service, Twilio.
Twilio API

Twilio provides a programmable SMS API service served over HTTPs. Twilio’s API enables the user to send and receive SMS messages, track the delivery of sent messages, and even schedule SMS messages to be sent at a later time.
Twilio is a very well established company and is known for their SMS provision, and is often celebrated as a bargain in accordance with Twilio’s pricing for its service.
Why use Twilio API to send SMS?
Most popular, Used by a lot of high value companies over multiple nations, support, guided documentation.
Why not to use Twilio API to send SMS?
Costly, lacks in the quality of analytical data sourced from engagement with the SMS sent.
Prerequisites
All you need to do before getting started is sign up on twilio, select a number that suits your needs, and just write the code:
Python code walkthrough
- First download Twilio's own CLI here.
- Download Twilio’s helper library by running the command- pip install twilio in the terminal.
- Paste the following code and copy your authorization token and account SID which are visible on your twilio dashboard.
- You can use the Twilio CLI or your own python environment to run the following code.
Replace the number you want to send it to in the to section the number that you just purchased to the from section.
Amazon SNS
AWS SNS has a unique structure for sending SMS. A topic is basically a collection of users that will get notified of your published messages, they can be users that you can choose to subscribe to the topic or not. You can also publish directly to a particular mobile phone, and both of these can be done either by the SNS SDK by Amazon or by the console of Amazon SNS.
The user can create, manage and subscriptions for their SMS texts.
Why use SNS API to send SMS?
Amazon has a unique no charges policy for 1 million requests (batched by size) each month, which makes it a comparatively inexpensive notification provider, using SNS contributes to the AWS credits provided to startups. Hence it becomes a good choice for startups.
Why not to use SNS API to send SMS?
There have been reports that SNS sometimes fails to notify their users when certain providers are down.
There are two ways of sending SMS using Amazon SNS, one is through publishing a message to a Topic or publishing to a mobile phone. We will use the AWS SDK to send an SMS to a phone number.
Prerequisites to send an SMS using Amazon SNS:
Install AWS python SDK on your PC, Sign Up on SNS and buy the number that suits your needs.
Code Walkthrough:
Vonage API
Vonage offers flexible and scalable voice, messaging, video and data capabilities across Unified Communications, Contact Centers and Communications APIs. Vonage provides a robust SMS API for its users that can help them send and receive messages in high volumes, and receive SMS using local numbers.
Why use Vonage API to send SMS?
Cost effective solutions for small businesses, simple to use UI, local and international network, high deliverability and success rates,capability to increase volume of messaging APIs and extends to a global reach.
Why not to use Vonage API to send SMS?
Provides chat only support, Additional features such as images, VOIP, cost extra.
Prerequisites for Vonage API
Register your brand and apply for its vetting, then register your campaign and link a number to it.
Code walkthrough:
- First install the dependencies using the ~pip install vonage command on your terminal.
- Create a file named ‘send-an-sms.py’ and write the following code

- To send an SMS, replace the following variables in the example below:
- VONAGE_API_KEY: Your Vonage API key (see it on your dashboard).
- VONAGE_API_SECRET: Your Vonage API secret (also available on your dashboard).
- VONAGE_BRAND_NAME: The alphanumeric string that represents the name or number of the organisation sending the message.
- TO_NUMBER: The phone number you are sending the message to.
That's it! You have sent your first message through the Vonage API.
SuprSend

Suprsend, provides services that end the difficulties faced by a growing business using the services of these SMS service providers.
Through SuprSend’s Python SDK, you can communicate with your subscribers over multiple channels with just a single trigger. SuprSend’s notification architecture sits on top of all of these SMS providers, with all infrastructure setup done to send notifications and receive delivery reports.
Why use Suprsend to send SMS?
You don’t need to worry about changing your SMS configuration as per the compliances of different countries. What makes Suprsend standout is it’s multi-channel API, which can also trigger notifications over various channels and gives immediate, actionable, and insightful data analytics. Suprsend boasts an intuitive UI that enables people with no prior programming experience to use its no-code architecture setup,Suprsend has great documentation, and great support on slack,email and chat.
Let’s quickly go through a guide to send your first notification using Python SDK.
Setup and Walkthrough
Let’s walk you through the steps of setting up and using the python SDK of Suprsend.
Prerequisites to use Suprsend:-
Sign up on Suprsend, Integrate your Python SDK, Create a user profile and you’re through!
Done with the setup, let’s code!
First let’s get a high level understanding of how Suprsend works. You create a workflow, and then put details into the following code snippet which contains information on the name of the workflow, the template name, the category of notification that is generated by the workflow like transactional or maybe promotional messages. You would also notice the “$channels” list which contains all the channels preference set by the users themselves or by the business.
Let’s trigger the Workflow from SuprSend API.
That’s it! We have triggered the workflow from our Backend SDK and sent SMS from the code. It’s really helpful how Suprsend makes it so easy to switch vendors and sits on the layer between Vendors and Customers to make common nuances faced by a growing business disappear.


